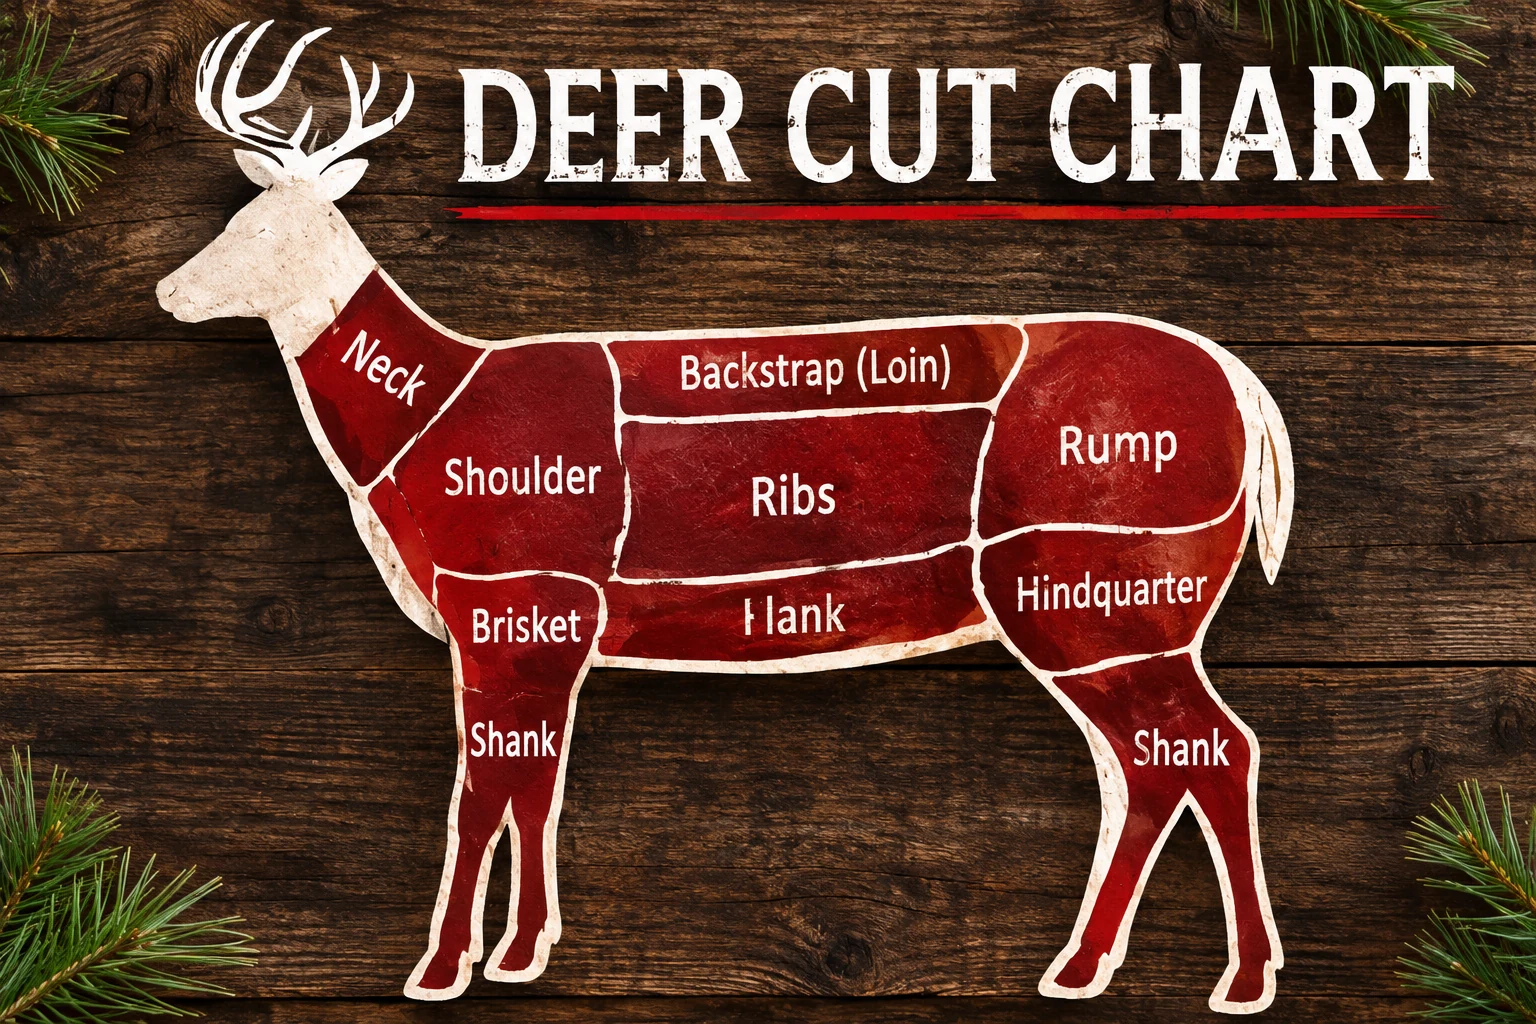
A little know-how for what’s in your freezer. Find your cut, pick your supper, and open a recipe card. Good food. A little camp humor. No fancy apron required.
Backstrap isn’t tenderloin.
Backstrap runs outside the backbone. Tenderloins are the smaller muscles inside the body cavity. Both are lean, tender cuts that suit skillet cooking.
Venison is lean. A little oil, a flavorful sauce and careful temperature checks help keep dinner from drying out.
CUT LOCATIONCOMMON USESCOOKING IDEAS
A little skillet magic
01
Backstrap / outer loin
Along the outside of the backbone.
A tender cut for chops or larger portions. Keep it whole for flexible slicing at home.
Try it at home: Sear in a hot, lightly oiled skillet; finish gently and serve with mushrooms or pan juices. Check the thickest part for 165°F.
From the recipe box
Tap a recipe name, eh?
Da Good Stuff Ain’t for Da Dog · Butter-and-Onion Skillet
Open the recipe card +
Original home-cooking draft · Not kitchen-tested. Independently authored. Playful Yooper names, not a claim of traditional regional authorship.
Butter-and-Onion Skillet
Serves: 4
Da Good Stuff Ain’t for Da Dog
Ingredients
1½ lb trimmed backstrap
¾ tsp salt
½ tsp black pepper
1 tbsp neutral oil, divided
2 tbsp butter
1 large onion, thinly sliced
1 tsp Worcestershire sauce
Directions
Remove silverskin. Cut meat across the grain into ½-inch medallions; pat dry and season with salt and pepper.
Before cooking the meat, soften onion in half the oil over medium heat for 10–12 minutes; transfer onion to a bowl.
Heat the remaining oil in a large skillet over medium-high heat. Brown meat in batches, about 1–2 minutes per side to start. Reduce heat as needed and continue until the center of each piece reaches 165°F; time varies with thickness. Transfer to a clean plate.
After removing the cooked meat, melt butter in the skillet. Add Worcestershire and the cooked onion, stir for 1 minute, and spoon over the meat.
Serve immediately; mashed potatoes or buttered noodles are good alongside.
Gravy Covers a Lotta Bad Decisions · Mushroom Gravy
Open the recipe card +
Original home-cooking draft · Not kitchen-tested. Independently authored. Playful Yooper names, not a claim of traditional regional authorship.
Mushroom Gravy
Serves: 4
Gravy Covers a Lotta Bad Decisions
Ingredients
1½ lb trimmed backstrap
¾ tsp salt
½ tsp black pepper
1 tbsp neutral oil
8 oz sliced mushrooms
2 tbsp butter
2 tbsp flour
1½ cups low-sodium beef broth
Directions
Remove silverskin. Cut meat across the grain into ½-inch medallions; pat dry and season with salt and pepper.
Heat oil in a large skillet over medium-high heat. Brown meat in batches, about 1–2 minutes per side to start. Reduce heat as needed and continue until the center of each piece reaches 165°F; time varies with thickness. Transfer to a clean plate.
After removing the cooked meat, melt butter in the same skillet. Add mushrooms and cook 6–8 minutes.
Stir in flour for 1 minute. Slowly whisk in broth, scraping the pan. Simmer 4–5 minutes until thick. Spoon gravy over the meat.
Serve immediately; mashed potatoes or buttered noodles are good alongside.
Grandma Brought Da Cracker Tin · Cracker-Crumb Cutlets
Open the recipe card +
Original home-cooking draft · Not kitchen-tested. Independently authored. Playful Yooper names, not a claim of traditional regional authorship.
Cracker-Crumb Cutlets
Serves: 4
Grandma Brought Da Cracker Tin
Ingredients
1½ lb trimmed backstrap
¾ tsp salt
½ tsp black pepper
1 tbsp neutral oil
½ cup flour
1 egg
2 tbsp milk
1 cup finely crushed saltine crackers
3 tbsp additional neutral oil
Directions
Remove silverskin. Cut meat across the grain into ½-inch medallions; pat dry and season with salt and pepper. Pound gently to an even ¼-inch thickness.
Put flour on one plate, beat egg with milk in a bowl, and spread cracker crumbs on another plate. Coat meat in flour, then egg, then crumbs.
Heat all 4 tbsp oil in a large skillet over medium heat. Fry in uncrowded batches, starting with 2–3 minutes per side, lowering heat if crumbs darken too fast. Check the centers reach 165°F.
Drain briefly on a rack and serve right away. Discard leftover coating ingredients that touched raw meat.
Pepper Steak, Same Old Flannel · Camp Pepper Steak
Open the recipe card +
Original home-cooking draft · Not kitchen-tested. Independently authored. Playful Yooper names, not a claim of traditional regional authorship.
Camp Pepper Steak
Serves: 4
Pepper Steak, Same Old Flannel
Ingredients
1½ lb trimmed backstrap
¾ tsp salt
½ tsp black pepper
1 tbsp neutral oil
1 onion, sliced
1 green bell pepper, sliced
1 cup low-sodium beef broth
1 tbsp Worcestershire sauce
1 tbsp cornstarch
2 tbsp cold water
Directions
Remove silverskin. Cut meat across the grain into ½-inch medallions; pat dry and season with salt and pepper.
Heat oil in a large skillet over medium-high heat. Brown meat in batches, about 1–2 minutes per side to start. Reduce heat as needed and continue until the center of each piece reaches 165°F; time varies with thickness. Transfer to a clean plate.
After removing meat, add onion and pepper to the pan and cook over medium heat 8 minutes. Add broth and Worcestershire; simmer 3 minutes.
Mix cornstarch with cold water and stir into simmering broth. Cook 1–2 minutes until glossy. Spoon over meat.
Serve immediately; mashed potatoes or buttered noodles are good alongside.
Put Your Good Paper Plate Out · Sour-Cream Pan Gravy
Open the recipe card +
Original home-cooking draft · Not kitchen-tested. Independently authored. Playful Yooper names, not a claim of traditional regional authorship.
Sour-Cream Pan Gravy
Serves: 4
Put Your Good Paper Plate Out
Ingredients
1½ lb trimmed backstrap
¾ tsp salt
½ tsp black pepper
1 tbsp neutral oil
1 small onion, diced
1 tbsp butter
1 tbsp flour
1 cup low-sodium beef broth
½ cup sour cream
Directions
Remove silverskin. Cut meat across the grain into ½-inch medallions; pat dry and season with salt and pepper.
Heat oil in a large skillet over medium-high heat. Brown meat in batches, about 1–2 minutes per side to start. Reduce heat as needed and continue until the center of each piece reaches 165°F; time varies with thickness. Transfer to a clean plate.
After removing meat, melt butter in the pan and soften onion for 6 minutes. Stir in flour for 1 minute, then slowly stir in broth. Simmer 4 minutes.
Take the pan off the heat. Stir a few spoonfuls of hot gravy into sour cream, then stir that mixture into the pan. Spoon over meat; do not boil after adding sour cream.
Serve immediately; mashed potatoes or buttered noodles are good alongside.
Pass Da Mustard, Not Your Opinion · Mustard-Butter Medallions
Open the recipe card +
Original home-cooking draft · Not kitchen-tested. Independently authored. Playful Yooper names, not a claim of traditional regional authorship.
Mustard-Butter Medallions
Serves: 4
Pass Da Mustard, Not Your Opinion
Ingredients
1½ lb trimmed backstrap
¾ tsp salt
½ tsp black pepper
1 tbsp neutral oil
2 tbsp butter
½ cup low-sodium beef broth
1 tbsp yellow mustard
1 tsp honey
Directions
Remove silverskin. Cut meat across the grain into ½-inch medallions; pat dry and season with salt and pepper.
Heat oil in a large skillet over medium-high heat. Brown meat in batches, about 1–2 minutes per side to start. Reduce heat as needed and continue until the center of each piece reaches 165°F; time varies with thickness. Transfer to a clean plate.
After removing meat, pour broth into the pan and scrape up the browned bits. Simmer 2 minutes.
Stir in mustard and honey. Turn off heat and stir in butter until melted. Spoon over meat.
Serve immediately; mashed potatoes or buttered noodles are good alongside.
A Sandwich Worth Coming Outta Da Blind For · Hot Onion Sandwiches
Open the recipe card +
Original home-cooking draft · Not kitchen-tested. Independently authored. Playful Yooper names, not a claim of traditional regional authorship.
Hot Onion Sandwiches
Serves: 4
A Sandwich Worth Coming Outta Da Blind For
Ingredients
1½ lb trimmed backstrap
¾ tsp salt
½ tsp black pepper
1 tbsp neutral oil
1 large onion, sliced
1 tbsp butter
4 sturdy sandwich rolls
4 slices Swiss cheese
2 tbsp prepared horseradish sauce
Directions
Remove silverskin. Cut meat across the grain into ½-inch medallions; pat dry and season with salt and pepper.
Before cooking meat, soften onion in the oil over medium heat for 10–12 minutes; remove to a bowl.
Heat oil in a large skillet over medium-high heat. Brown meat in batches, about 1–2 minutes per side to start. Reduce heat as needed and continue until the center of each piece reaches 165°F; time varies with thickness. Transfer to a clean plate.
Thinly slice the cooked meat. Butter the split rolls and toast them cut-side up under a broiler, watching closely. Divide meat and onions among rolls, add cheese, and broil just until cheese melts. Spread with horseradish sauce and serve.
Serve immediately; mashed potatoes or buttered noodles are good alongside.
The good stuff
02
Tenderloins
Inside the body cavity, along the spine.
Small, tender muscles, separate from the backstrap. Commonly portioned into medallions.
Try it at home: Cook gently in a skillet with a little butter or oil. Their small size means they cook quickly; use a thermometer to reach 165°F.
From the recipe box
Tap a recipe name, eh?
Tiny Loins, Big Argument · Butter-and-Onion Skillet
Open the recipe card +
Original home-cooking draft · Not kitchen-tested. Independently authored. Playful Yooper names, not a claim of traditional regional authorship.
Butter-and-Onion Skillet
Serves: 4
Tiny Loins, Big Argument
Ingredients
1½ lb trimmed tenderloins
¾ tsp salt
½ tsp black pepper
1 tbsp neutral oil, divided
2 tbsp butter
1 large onion, thinly sliced
1 tsp Worcestershire sauce
Directions
Remove silverskin. Cut meat across the grain into ½-inch medallions; pat dry and season with salt and pepper.
Before cooking the meat, soften onion in half the oil over medium heat for 10–12 minutes; transfer onion to a bowl.
Heat the remaining oil in a large skillet over medium-high heat. Brown meat in batches, about 1–2 minutes per side to start. Reduce heat as needed and continue until the center of each piece reaches 165°F; time varies with thickness. Transfer to a clean plate.
After removing the cooked meat, melt butter in the skillet. Add Worcestershire and the cooked onion, stir for 1 minute, and spoon over the meat.
Serve immediately; mashed potatoes or buttered noodles are good alongside.
Quit Picking Mushrooms Out, Gary · Mushroom Gravy
Open the recipe card +
Original home-cooking draft · Not kitchen-tested. Independently authored. Playful Yooper names, not a claim of traditional regional authorship.
Mushroom Gravy
Serves: 4
Quit Picking Mushrooms Out, Gary
Ingredients
1½ lb trimmed tenderloins
¾ tsp salt
½ tsp black pepper
1 tbsp neutral oil
8 oz sliced mushrooms
2 tbsp butter
2 tbsp flour
1½ cups low-sodium beef broth
Directions
Remove silverskin. Cut meat across the grain into ½-inch medallions; pat dry and season with salt and pepper.
Heat oil in a large skillet over medium-high heat. Brown meat in batches, about 1–2 minutes per side to start. Reduce heat as needed and continue until the center of each piece reaches 165°F; time varies with thickness. Transfer to a clean plate.
After removing the cooked meat, melt butter in the same skillet. Add mushrooms and cook 6–8 minutes.
Stir in flour for 1 minute. Slowly whisk in broth, scraping the pan. Simmer 4–5 minutes until thick. Spoon gravy over the meat.
Serve immediately; mashed potatoes or buttered noodles are good alongside.
Church Clothes Optional · Cracker-Crumb Cutlets
Open the recipe card +
Original home-cooking draft · Not kitchen-tested. Independently authored. Playful Yooper names, not a claim of traditional regional authorship.
Cracker-Crumb Cutlets
Serves: 4
Church Clothes Optional
Ingredients
1½ lb trimmed tenderloins
¾ tsp salt
½ tsp black pepper
1 tbsp neutral oil
½ cup flour
1 egg
2 tbsp milk
1 cup finely crushed saltine crackers
3 tbsp additional neutral oil
Directions
Remove silverskin. Cut meat across the grain into ½-inch medallions; pat dry and season with salt and pepper. Pound gently to an even ¼-inch thickness.
Put flour on one plate, beat egg with milk in a bowl, and spread cracker crumbs on another plate. Coat meat in flour, then egg, then crumbs.
Heat all 4 tbsp oil in a large skillet over medium heat. Fry in uncrowded batches, starting with 2–3 minutes per side, lowering heat if crumbs darken too fast. Check the centers reach 165°F.
Drain briefly on a rack and serve right away. Discard leftover coating ingredients that touched raw meat.
Da Bell Pepper Finally Got Invited · Camp Pepper Steak
Open the recipe card +
Original home-cooking draft · Not kitchen-tested. Independently authored. Playful Yooper names, not a claim of traditional regional authorship.
Camp Pepper Steak
Serves: 4
Da Bell Pepper Finally Got Invited
Ingredients
1½ lb trimmed tenderloins
¾ tsp salt
½ tsp black pepper
1 tbsp neutral oil
1 onion, sliced
1 green bell pepper, sliced
1 cup low-sodium beef broth
1 tbsp Worcestershire sauce
1 tbsp cornstarch
2 tbsp cold water
Directions
Remove silverskin. Cut meat across the grain into ½-inch medallions; pat dry and season with salt and pepper.
Heat oil in a large skillet over medium-high heat. Brown meat in batches, about 1–2 minutes per side to start. Reduce heat as needed and continue until the center of each piece reaches 165°F; time varies with thickness. Transfer to a clean plate.
After removing meat, add onion and pepper to the pan and cook over medium heat 8 minutes. Add broth and Worcestershire; simmer 3 minutes.
Mix cornstarch with cold water and stir into simmering broth. Cook 1–2 minutes until glossy. Spoon over meat.
Serve immediately; mashed potatoes or buttered noodles are good alongside.
Fancy Means We Used Sour Cream · Sour-Cream Pan Gravy
Open the recipe card +
Original home-cooking draft · Not kitchen-tested. Independently authored. Playful Yooper names, not a claim of traditional regional authorship.
Sour-Cream Pan Gravy
Serves: 4
Fancy Means We Used Sour Cream
Ingredients
1½ lb trimmed tenderloins
¾ tsp salt
½ tsp black pepper
1 tbsp neutral oil
1 small onion, diced
1 tbsp butter
1 tbsp flour
1 cup low-sodium beef broth
½ cup sour cream
Directions
Remove silverskin. Cut meat across the grain into ½-inch medallions; pat dry and season with salt and pepper.
Heat oil in a large skillet over medium-high heat. Brown meat in batches, about 1–2 minutes per side to start. Reduce heat as needed and continue until the center of each piece reaches 165°F; time varies with thickness. Transfer to a clean plate.
After removing meat, melt butter in the pan and soften onion for 6 minutes. Stir in flour for 1 minute, then slowly stir in broth. Simmer 4 minutes.
Take the pan off the heat. Stir a few spoonfuls of hot gravy into sour cream, then stir that mixture into the pan. Spoon over meat; do not boil after adding sour cream.
Serve immediately; mashed potatoes or buttered noodles are good alongside.
Original home-cooking draft · Not kitchen-tested. Independently authored. Playful Yooper names, not a claim of traditional regional authorship.
Mustard-Butter Medallions
Serves: 4
Yellow Mustard, Five-Star Attitude
Ingredients
1½ lb trimmed tenderloins
¾ tsp salt
½ tsp black pepper
1 tbsp neutral oil
2 tbsp butter
½ cup low-sodium beef broth
1 tbsp yellow mustard
1 tsp honey
Directions
Remove silverskin. Cut meat across the grain into ½-inch medallions; pat dry and season with salt and pepper.
Heat oil in a large skillet over medium-high heat. Brown meat in batches, about 1–2 minutes per side to start. Reduce heat as needed and continue until the center of each piece reaches 165°F; time varies with thickness. Transfer to a clean plate.
After removing meat, pour broth into the pan and scrape up the browned bits. Simmer 2 minutes.
Stir in mustard and honey. Turn off heat and stir in butter until melted. Spoon over meat.
Serve immediately; mashed potatoes or buttered noodles are good alongside.
Save Two for Da Cook, Eh? · Hot Onion Sandwiches
Open the recipe card +
Original home-cooking draft · Not kitchen-tested. Independently authored. Playful Yooper names, not a claim of traditional regional authorship.
Hot Onion Sandwiches
Serves: 4
Save Two for Da Cook, Eh?
Ingredients
1½ lb trimmed tenderloins
¾ tsp salt
½ tsp black pepper
1 tbsp neutral oil
1 large onion, sliced
1 tbsp butter
4 sturdy sandwich rolls
4 slices Swiss cheese
2 tbsp prepared horseradish sauce
Directions
Remove silverskin. Cut meat across the grain into ½-inch medallions; pat dry and season with salt and pepper.
Before cooking meat, soften onion in the oil over medium heat for 10–12 minutes; remove to a bowl.
Heat oil in a large skillet over medium-high heat. Brown meat in batches, about 1–2 minutes per side to start. Reduce heat as needed and continue until the center of each piece reaches 165°F; time varies with thickness. Transfer to a clean plate.
Thinly slice the cooked meat. Butter the split rolls and toast them cut-side up under a broiler, watching closely. Divide meat and onions among rolls, add cheese, and broil just until cheese melts. Spread with horseradish sauce and serve.
Serve immediately; mashed potatoes or buttered noodles are good alongside.
Sunday-supper territory
03
Hindquarter / round
The upper rear legs and rump.
Provides roasts and steaks. A versatile cut that pairs well with slow, moist cooking.
Try it at home: Try a covered pot roast or simmer cubed meat in gravy. Slice cooked roast across the grain.
From the recipe box
Tap a recipe name, eh?
Da Round Finally Came Around · Pot Roast with Potatoes and Carrots
Open the recipe card +
Original home-cooking draft · Not kitchen-tested. Independently authored. Playful Yooper names, not a claim of traditional regional authorship.
Pot Roast with Potatoes and Carrots
Serves: 6
Da Round Finally Came Around
Ingredients
2½ lb boneless round roast, cut into 3 large pieces
1 tbsp neutral oil
1 tsp salt
½ tsp black pepper
1 large onion, chopped
2 garlic cloves, minced
3 cups low-sodium beef broth, plus more if needed
1 bay leaf
1½ lb potatoes, cut into 2-inch chunks
4 carrots, cut into 2-inch pieces
Directions
Heat oven to 300°F. Trim accessible silverskin and hard fat from the meat; pat dry and season with salt and pepper.
Heat oil in a Dutch oven over medium-high heat. Brown meat on all sides, in batches if needed; transfer to a plate. Soften onion in the same pot for 5 minutes; add garlic for 30 seconds.
Add broth and scrape up browned bits. Return meat and add bay leaf. Liquid should reach about halfway to two-thirds up the meat; add broth if necessary.
Cover tightly and bake 3–4 hours, until a fork twists easily in the meat. Check liquid every hour and replenish with hot broth as needed. Begin the finishing steps below at the indicated point; timing depends on the animal and size of the cut. Confirm the meat reaches at least 165°F in the thickest part; tenderness may take longer.
Add potatoes and carrots for the final 60–75 minutes, keeping the pot covered until meat and vegetables are tender.
Remove and discard the bay leaf. If serving the meat in pieces, spoon the pot juices over it. Taste before adding any more salt.
The clock is a guide: collagen-rich cuts need enough covered cooking to become fork-tender. Keep the pot from drying out.
Nobody’s Complaining Under This Gravy · Mushroom-and-Onion Gravy
Open the recipe card +
Original home-cooking draft · Not kitchen-tested. Independently authored. Playful Yooper names, not a claim of traditional regional authorship.
Mushroom-and-Onion Gravy
Serves: 6
Nobody’s Complaining Under This Gravy
Ingredients
2½ lb boneless round roast, cut into 3 large pieces
1 tbsp neutral oil
1 tsp salt
½ tsp black pepper
1 large onion, chopped
2 garlic cloves, minced
3 cups low-sodium beef broth, plus more if needed
1 bay leaf
12 oz mushrooms, halved
2 tbsp cornstarch
3 tbsp cold water
Directions
Heat oven to 300°F. Trim accessible silverskin and hard fat from the meat; pat dry and season with salt and pepper.
Heat oil in a Dutch oven over medium-high heat. Brown meat on all sides, in batches if needed; transfer to a plate. Soften onion in the same pot for 5 minutes; add garlic for 30 seconds.
Add broth and scrape up browned bits. Return meat and add bay leaf. Liquid should reach about halfway to two-thirds up the meat; add broth if necessary.
Cover tightly and bake 3–4 hours, until a fork twists easily in the meat. Check liquid every hour and replenish with hot broth as needed. Begin the finishing steps below at the indicated point; timing depends on the animal and size of the cut. Confirm the meat reaches at least 165°F in the thickest part; tenderness may take longer.
Add mushrooms for the final hour. Once meat is tender, move it to a platter. Mix cornstarch with cold water; stir into the simmering pot juices and cook 2–3 minutes. Return meat to the gravy.
Remove and discard the bay leaf. If serving the meat in pieces, spoon the pot juices over it. Taste before adding any more salt.
The clock is a guide: collagen-rich cuts need enough covered cooking to become fork-tender. Keep the pot from drying out.
Swiss Steak Without Da Plane Ticket · Tomato-Braised Camp Supper
Open the recipe card +
Original home-cooking draft · Not kitchen-tested. Independently authored. Playful Yooper names, not a claim of traditional regional authorship.
Tomato-Braised Camp Supper
Serves: 6
Swiss Steak Without Da Plane Ticket
Ingredients
2½ lb boneless round roast, cut into 3 large pieces
1 tbsp neutral oil
1 tsp salt
½ tsp black pepper
1 large onion, chopped
2 garlic cloves, minced
3 cups low-sodium beef broth, plus more if needed
1 bay leaf
1 can (14½ oz) diced tomatoes, with juices
1 tsp paprika
1 lb potatoes, cut into 2-inch chunks
Directions
Heat oven to 300°F. Trim accessible silverskin and hard fat from the meat; pat dry and season with salt and pepper.
Heat oil in a Dutch oven over medium-high heat. Brown meat on all sides, in batches if needed; transfer to a plate. Soften onion in the same pot for 5 minutes; add garlic for 30 seconds.
Add broth and scrape up browned bits. Return meat and add bay leaf. Liquid should reach about halfway to two-thirds up the meat; add broth if necessary.
Stir in the tomatoes and paprika now. Confirm the meat reaches at least 165°F in the thickest part; tenderness may take longer.
Cover tightly and bake 3–4 hours, until a fork twists easily in the meat. Check liquid every hour and replenish with hot broth as needed. Begin the finishing steps below at the indicated point; timing depends on the animal and size of the cut.
Add potatoes for the final 60–75 minutes and cook until tender.
Remove and discard the bay leaf. If serving the meat in pieces, spoon the pot juices over it. Taste before adding any more salt.
The clock is a guide: collagen-rich cuts need enough covered cooking to become fork-tender. Keep the pot from drying out.
Grandma Found Her Big Pot · Cabbage-and-Carrot Pot
Open the recipe card +
Original home-cooking draft · Not kitchen-tested. Independently authored. Playful Yooper names, not a claim of traditional regional authorship.
Cabbage-and-Carrot Pot
Serves: 6
Grandma Found Her Big Pot
Ingredients
2½ lb boneless round roast, cut into 3 large pieces
1 tbsp neutral oil
1 tsp salt
½ tsp black pepper
1 large onion, chopped
2 garlic cloves, minced
3 cups low-sodium beef broth, plus more if needed
1 bay leaf
½ medium green cabbage, cut into 4 wedges
3 carrots, cut into chunks
1 tbsp cider vinegar
Directions
Heat oven to 300°F. Trim accessible silverskin and hard fat from the meat; pat dry and season with salt and pepper.
Heat oil in a Dutch oven over medium-high heat. Brown meat on all sides, in batches if needed; transfer to a plate. Soften onion in the same pot for 5 minutes; add garlic for 30 seconds.
Add broth and scrape up browned bits. Return meat and add bay leaf. Liquid should reach about halfway to two-thirds up the meat; add broth if necessary.
Cover tightly and bake 3–4 hours, until a fork twists easily in the meat. Check liquid every hour and replenish with hot broth as needed. Begin the finishing steps below at the indicated point; timing depends on the animal and size of the cut. Confirm the meat reaches at least 165°F in the thickest part; tenderness may take longer.
Add carrots for the final hour. Nestle cabbage into the liquid for the final 35–45 minutes. When vegetables and meat are tender, stir in cider vinegar.
Remove and discard the bay leaf. If serving the meat in pieces, spoon the pot juices over it. Taste before adding any more salt.
The clock is a guide: collagen-rich cuts need enough covered cooking to become fork-tender. Keep the pot from drying out.
Soup Thick Enough to Hold a Spoon · Old-School Barley Stew
Open the recipe card +
Original home-cooking draft · Not kitchen-tested. Independently authored. Playful Yooper names, not a claim of traditional regional authorship.
Old-School Barley Stew
Serves: 6
Soup Thick Enough to Hold a Spoon
Ingredients
2½ lb boneless round roast, cut into 3 large pieces
1 tbsp neutral oil
1 tsp salt
½ tsp black pepper
1 large onion, chopped
2 garlic cloves, minced
3 cups low-sodium beef broth, plus more if needed
1 bay leaf
¾ cup pearl barley, rinsed
3 carrots, diced
2 celery stalks, diced
3 cups additional low-sodium beef broth
Directions
Heat oven to 300°F. Trim accessible silverskin and hard fat from the meat; pat dry and season with salt and pepper.
Heat oil in a Dutch oven over medium-high heat. Brown meat on all sides, in batches if needed; transfer to a plate. Soften onion in the same pot for 5 minutes; add garlic for 30 seconds.
Add broth and scrape up browned bits. Return meat and add bay leaf. Liquid should reach about halfway to two-thirds up the meat; add broth if necessary.
Cover tightly and bake 3–4 hours, until a fork twists easily in the meat. Check liquid every hour and replenish with hot broth as needed. Begin the finishing steps below at the indicated point; timing depends on the animal and size of the cut. Confirm the meat reaches at least 165°F in the thickest part; tenderness may take longer.
When the meat is tender, remove it and cut or shred into bite-size pieces. Add extra broth, barley, carrots and celery to the pot. Simmer gently, covered, 45–60 minutes until barley is tender. Return meat and heat the whole stew to 165°F.
Remove and discard the bay leaf. If serving the meat in pieces, spoon the pot juices over it. Taste before adding any more salt.
The clock is a guide: collagen-rich cuts need enough covered cooking to become fork-tender. Keep the pot from drying out.
Put a Biscuit Blanket on It · Stew with Drop Dumplings
Open the recipe card +
Original home-cooking draft · Not kitchen-tested. Independently authored. Playful Yooper names, not a claim of traditional regional authorship.
Stew with Drop Dumplings
Serves: 6
Put a Biscuit Blanket on It
Ingredients
2½ lb boneless round roast, cut into 3 large pieces
1 tbsp neutral oil
1 tsp salt
½ tsp black pepper
1 large onion, chopped
2 garlic cloves, minced
3 cups low-sodium beef broth, plus more if needed
1 bay leaf
3 carrots, sliced
1 cup frozen peas
1 cup all-purpose flour
1½ tsp baking powder
¼ tsp salt for dumplings
½ cup milk
1 tbsp melted butter
Directions
Heat oven to 300°F. Trim accessible silverskin and hard fat from the meat; pat dry and season with salt and pepper.
Heat oil in a Dutch oven over medium-high heat. Brown meat on all sides, in batches if needed; transfer to a plate. Soften onion in the same pot for 5 minutes; add garlic for 30 seconds.
Add broth and scrape up browned bits. Return meat and add bay leaf. Liquid should reach about halfway to two-thirds up the meat; add broth if necessary.
Cover tightly and bake 3–4 hours, until a fork twists easily in the meat. Check liquid every hour and replenish with hot broth as needed. Begin the finishing steps below at the indicated point; timing depends on the animal and size of the cut. Confirm the meat reaches at least 165°F in the thickest part; tenderness may take longer.
Add carrots during the final hour of braising. When meat is tender, remove it and cut or shred. Return meat to the pot with peas; bring to a gentle stovetop simmer.
Mix flour, baking powder and dumpling salt. Stir in milk and melted butter just until combined. Drop 8 small spoonfuls onto the simmering stew. Cover tightly and simmer gently for 15–18 minutes without lifting the lid. Split one dumpling to check that the center is fluffy, not wet dough; cook a few minutes longer if needed. Heat stew to 165°F.
Remove and discard the bay leaf. If serving the meat in pieces, spoon the pot juices over it. Taste before adding any more salt. Check that the center of the largest dumpling reaches 165°F before serving.
The clock is a guide: collagen-rich cuts need enough covered cooking to become fork-tender. Keep the pot from drying out.
Dip Your Chin, Not Your Sleeve · Pulled Venison Sandwiches
Open the recipe card +
Original home-cooking draft · Not kitchen-tested. Independently authored. Playful Yooper names, not a claim of traditional regional authorship.
Pulled Venison Sandwiches
Serves: 6
Dip Your Chin, Not Your Sleeve
Ingredients
2½ lb boneless round roast, cut into 3 large pieces
1 tbsp neutral oil
1 tsp salt
½ tsp black pepper
1 large onion, chopped
2 garlic cloves, minced
3 cups low-sodium beef broth, plus more if needed
1 bay leaf
¾ cup barbecue sauce
1 tbsp cider vinegar
6 sandwich buns
Directions
Heat oven to 300°F. Trim accessible silverskin and hard fat from the meat; pat dry and season with salt and pepper.
Heat oil in a Dutch oven over medium-high heat. Brown meat on all sides, in batches if needed; transfer to a plate. Soften onion in the same pot for 5 minutes; add garlic for 30 seconds.
Add broth and scrape up browned bits. Return meat and add bay leaf. Liquid should reach about halfway to two-thirds up the meat; add broth if necessary.
Cover tightly and bake 3–4 hours, until a fork twists easily in the meat. Check liquid every hour and replenish with hot broth as needed. Begin the finishing steps below at the indicated point; timing depends on the animal and size of the cut. Confirm the meat reaches at least 165°F in the thickest part; tenderness may take longer.
When meat is fork-tender, lift it out and discard any bones and tough connective pieces. Shred the meat.
Mix meat with barbecue sauce, vinegar and ½ cup cooking liquid. Heat gently to 165°F, adding more cooking liquid if needed. Divide among buns. Save or freeze extra cooking liquid separately.
Remove and discard the bay leaf. If serving the meat in pieces, spoon the pot juices over it. Taste before adding any more salt.
The clock is a guide: collagen-rich cuts need enough covered cooking to become fork-tender. Keep the pot from drying out.
Low, slow & worth it
04
Shoulder / chuck
The upper front legs.
Often used for roasts, stew or ground meat. Slow, moist cooking suits the working muscles.
Try it at home: Brown first, then braise covered with broth until fork-tender. Good with onions, carrots and mashed potatoes.
From the recipe box
Tap a recipe name, eh?
That Shoulder Ain’t All Burger · Pot Roast with Potatoes and Carrots
Open the recipe card +
Original home-cooking draft · Not kitchen-tested. Independently authored. Playful Yooper names, not a claim of traditional regional authorship.
Pot Roast with Potatoes and Carrots
Serves: 6
That Shoulder Ain’t All Burger
Ingredients
3 lb boneless shoulder roast, cut into 3 large pieces
1 tbsp neutral oil
1 tsp salt
½ tsp black pepper
1 large onion, chopped
2 garlic cloves, minced
3 cups low-sodium beef broth, plus more if needed
1 bay leaf
1½ lb potatoes, cut into 2-inch chunks
4 carrots, cut into 2-inch pieces
Directions
Heat oven to 300°F. Trim accessible silverskin and hard fat from the meat; pat dry and season with salt and pepper.
Heat oil in a Dutch oven over medium-high heat. Brown meat on all sides, in batches if needed; transfer to a plate. Soften onion in the same pot for 5 minutes; add garlic for 30 seconds.
Add broth and scrape up browned bits. Return meat and add bay leaf. Liquid should reach about halfway to two-thirds up the meat; add broth if necessary.
Cover tightly and bake 3½–5 hours, until a fork twists easily in the meat. Check liquid every hour and replenish with hot broth as needed. Begin the finishing steps below at the indicated point; timing depends on the animal and size of the cut. Confirm the meat reaches at least 165°F in the thickest part; tenderness may take longer.
Add potatoes and carrots for the final 60–75 minutes, keeping the pot covered until meat and vegetables are tender.
Remove and discard the bay leaf. If serving the meat in pieces, spoon the pot juices over it. Taste before adding any more salt.
The clock is a guide: collagen-rich cuts need enough covered cooking to become fork-tender. Keep the pot from drying out.
Ya Can’t Rush Supper, Gary · Mushroom-and-Onion Gravy
Open the recipe card +
Original home-cooking draft · Not kitchen-tested. Independently authored. Playful Yooper names, not a claim of traditional regional authorship.
Mushroom-and-Onion Gravy
Serves: 6
Ya Can’t Rush Supper, Gary
Ingredients
3 lb boneless shoulder roast, cut into 3 large pieces
1 tbsp neutral oil
1 tsp salt
½ tsp black pepper
1 large onion, chopped
2 garlic cloves, minced
3 cups low-sodium beef broth, plus more if needed
1 bay leaf
12 oz mushrooms, halved
2 tbsp cornstarch
3 tbsp cold water
Directions
Heat oven to 300°F. Trim accessible silverskin and hard fat from the meat; pat dry and season with salt and pepper.
Heat oil in a Dutch oven over medium-high heat. Brown meat on all sides, in batches if needed; transfer to a plate. Soften onion in the same pot for 5 minutes; add garlic for 30 seconds.
Add broth and scrape up browned bits. Return meat and add bay leaf. Liquid should reach about halfway to two-thirds up the meat; add broth if necessary.
Cover tightly and bake 3½–5 hours, until a fork twists easily in the meat. Check liquid every hour and replenish with hot broth as needed. Begin the finishing steps below at the indicated point; timing depends on the animal and size of the cut. Confirm the meat reaches at least 165°F in the thickest part; tenderness may take longer.
Add mushrooms for the final hour. Once meat is tender, move it to a platter. Mix cornstarch with cold water; stir into the simmering pot juices and cook 2–3 minutes. Return meat to the gravy.
Remove and discard the bay leaf. If serving the meat in pieces, spoon the pot juices over it. Taste before adding any more salt.
The clock is a guide: collagen-rich cuts need enough covered cooking to become fork-tender. Keep the pot from drying out.
Red Gravy, Orange Hat · Tomato-Braised Camp Supper
Open the recipe card +
Original home-cooking draft · Not kitchen-tested. Independently authored. Playful Yooper names, not a claim of traditional regional authorship.
Tomato-Braised Camp Supper
Serves: 6
Red Gravy, Orange Hat
Ingredients
3 lb boneless shoulder roast, cut into 3 large pieces
1 tbsp neutral oil
1 tsp salt
½ tsp black pepper
1 large onion, chopped
2 garlic cloves, minced
3 cups low-sodium beef broth, plus more if needed
1 bay leaf
1 can (14½ oz) diced tomatoes, with juices
1 tsp paprika
1 lb potatoes, cut into 2-inch chunks
Directions
Heat oven to 300°F. Trim accessible silverskin and hard fat from the meat; pat dry and season with salt and pepper.
Heat oil in a Dutch oven over medium-high heat. Brown meat on all sides, in batches if needed; transfer to a plate. Soften onion in the same pot for 5 minutes; add garlic for 30 seconds.
Add broth and scrape up browned bits. Return meat and add bay leaf. Liquid should reach about halfway to two-thirds up the meat; add broth if necessary.
Stir in the tomatoes and paprika now. Confirm the meat reaches at least 165°F in the thickest part; tenderness may take longer.
Cover tightly and bake 3½–5 hours, until a fork twists easily in the meat. Check liquid every hour and replenish with hot broth as needed. Begin the finishing steps below at the indicated point; timing depends on the animal and size of the cut.
Add potatoes for the final 60–75 minutes and cook until tender.
Remove and discard the bay leaf. If serving the meat in pieces, spoon the pot juices over it. Taste before adding any more salt.
The clock is a guide: collagen-rich cuts need enough covered cooking to become fork-tender. Keep the pot from drying out.
Crack a Window at Camp · Cabbage-and-Carrot Pot
Open the recipe card +
Original home-cooking draft · Not kitchen-tested. Independently authored. Playful Yooper names, not a claim of traditional regional authorship.
Cabbage-and-Carrot Pot
Serves: 6
Crack a Window at Camp
Ingredients
3 lb boneless shoulder roast, cut into 3 large pieces
1 tbsp neutral oil
1 tsp salt
½ tsp black pepper
1 large onion, chopped
2 garlic cloves, minced
3 cups low-sodium beef broth, plus more if needed
1 bay leaf
½ medium green cabbage, cut into 4 wedges
3 carrots, cut into chunks
1 tbsp cider vinegar
Directions
Heat oven to 300°F. Trim accessible silverskin and hard fat from the meat; pat dry and season with salt and pepper.
Heat oil in a Dutch oven over medium-high heat. Brown meat on all sides, in batches if needed; transfer to a plate. Soften onion in the same pot for 5 minutes; add garlic for 30 seconds.
Add broth and scrape up browned bits. Return meat and add bay leaf. Liquid should reach about halfway to two-thirds up the meat; add broth if necessary.
Cover tightly and bake 3½–5 hours, until a fork twists easily in the meat. Check liquid every hour and replenish with hot broth as needed. Begin the finishing steps below at the indicated point; timing depends on the animal and size of the cut. Confirm the meat reaches at least 165°F in the thickest part; tenderness may take longer.
Add carrots for the final hour. Nestle cabbage into the liquid for the final 35–45 minutes. When vegetables and meat are tender, stir in cider vinegar.
Remove and discard the bay leaf. If serving the meat in pieces, spoon the pot juices over it. Taste before adding any more salt.
The clock is a guide: collagen-rich cuts need enough covered cooking to become fork-tender. Keep the pot from drying out.
Da Spoon-Stander · Old-School Barley Stew
Open the recipe card +
Original home-cooking draft · Not kitchen-tested. Independently authored. Playful Yooper names, not a claim of traditional regional authorship.
Old-School Barley Stew
Serves: 6
Da Spoon-Stander
Ingredients
3 lb boneless shoulder roast, cut into 3 large pieces
1 tbsp neutral oil
1 tsp salt
½ tsp black pepper
1 large onion, chopped
2 garlic cloves, minced
3 cups low-sodium beef broth, plus more if needed
1 bay leaf
¾ cup pearl barley, rinsed
3 carrots, diced
2 celery stalks, diced
3 cups additional low-sodium beef broth
Directions
Heat oven to 300°F. Trim accessible silverskin and hard fat from the meat; pat dry and season with salt and pepper.
Heat oil in a Dutch oven over medium-high heat. Brown meat on all sides, in batches if needed; transfer to a plate. Soften onion in the same pot for 5 minutes; add garlic for 30 seconds.
Add broth and scrape up browned bits. Return meat and add bay leaf. Liquid should reach about halfway to two-thirds up the meat; add broth if necessary.
Cover tightly and bake 3½–5 hours, until a fork twists easily in the meat. Check liquid every hour and replenish with hot broth as needed. Begin the finishing steps below at the indicated point; timing depends on the animal and size of the cut. Confirm the meat reaches at least 165°F in the thickest part; tenderness may take longer.
When the meat is tender, remove it and cut or shred into bite-size pieces. Add extra broth, barley, carrots and celery to the pot. Simmer gently, covered, 45–60 minutes until barley is tender. Return meat and heat the whole stew to 165°F.
Remove and discard the bay leaf. If serving the meat in pieces, spoon the pot juices over it. Taste before adding any more salt.
The clock is a guide: collagen-rich cuts need enough covered cooking to become fork-tender. Keep the pot from drying out.
Little Clouds over Deer Camp · Stew with Drop Dumplings
Open the recipe card +
Original home-cooking draft · Not kitchen-tested. Independently authored. Playful Yooper names, not a claim of traditional regional authorship.
Stew with Drop Dumplings
Serves: 6
Little Clouds over Deer Camp
Ingredients
3 lb boneless shoulder roast, cut into 3 large pieces
1 tbsp neutral oil
1 tsp salt
½ tsp black pepper
1 large onion, chopped
2 garlic cloves, minced
3 cups low-sodium beef broth, plus more if needed
1 bay leaf
3 carrots, sliced
1 cup frozen peas
1 cup all-purpose flour
1½ tsp baking powder
¼ tsp salt for dumplings
½ cup milk
1 tbsp melted butter
Directions
Heat oven to 300°F. Trim accessible silverskin and hard fat from the meat; pat dry and season with salt and pepper.
Heat oil in a Dutch oven over medium-high heat. Brown meat on all sides, in batches if needed; transfer to a plate. Soften onion in the same pot for 5 minutes; add garlic for 30 seconds.
Add broth and scrape up browned bits. Return meat and add bay leaf. Liquid should reach about halfway to two-thirds up the meat; add broth if necessary.
Cover tightly and bake 3½–5 hours, until a fork twists easily in the meat. Check liquid every hour and replenish with hot broth as needed. Begin the finishing steps below at the indicated point; timing depends on the animal and size of the cut. Confirm the meat reaches at least 165°F in the thickest part; tenderness may take longer.
Add carrots during the final hour of braising. When meat is tender, remove it and cut or shred. Return meat to the pot with peas; bring to a gentle stovetop simmer.
Mix flour, baking powder and dumpling salt. Stir in milk and melted butter just until combined. Drop 8 small spoonfuls onto the simmering stew. Cover tightly and simmer gently for 15–18 minutes without lifting the lid. Split one dumpling to check that the center is fluffy, not wet dough; cook a few minutes longer if needed. Heat stew to 165°F.
Remove and discard the bay leaf. If serving the meat in pieces, spoon the pot juices over it. Taste before adding any more salt. Check that the center of the largest dumpling reaches 165°F before serving.
The clock is a guide: collagen-rich cuts need enough covered cooking to become fork-tender. Keep the pot from drying out.
Keep Da Sauce Off Da Steering Wheel · Pulled Venison Sandwiches
Open the recipe card +
Original home-cooking draft · Not kitchen-tested. Independently authored. Playful Yooper names, not a claim of traditional regional authorship.
Pulled Venison Sandwiches
Serves: 6
Keep Da Sauce Off Da Steering Wheel
Ingredients
3 lb boneless shoulder roast, cut into 3 large pieces
1 tbsp neutral oil
1 tsp salt
½ tsp black pepper
1 large onion, chopped
2 garlic cloves, minced
3 cups low-sodium beef broth, plus more if needed
1 bay leaf
¾ cup barbecue sauce
1 tbsp cider vinegar
6 sandwich buns
Directions
Heat oven to 300°F. Trim accessible silverskin and hard fat from the meat; pat dry and season with salt and pepper.
Heat oil in a Dutch oven over medium-high heat. Brown meat on all sides, in batches if needed; transfer to a plate. Soften onion in the same pot for 5 minutes; add garlic for 30 seconds.
Add broth and scrape up browned bits. Return meat and add bay leaf. Liquid should reach about halfway to two-thirds up the meat; add broth if necessary.
Cover tightly and bake 3½–5 hours, until a fork twists easily in the meat. Check liquid every hour and replenish with hot broth as needed. Begin the finishing steps below at the indicated point; timing depends on the animal and size of the cut. Confirm the meat reaches at least 165°F in the thickest part; tenderness may take longer.
When meat is fork-tender, lift it out and discard any bones and tough connective pieces. Shred the meat.
Mix meat with barbecue sauce, vinegar and ½ cup cooking liquid. Heat gently to 165°F, adding more cooking liquid if needed. Divide among buns. Save or freeze extra cooking liquid separately.
Remove and discard the bay leaf. If serving the meat in pieces, spoon the pot juices over it. Taste before adding any more salt.
The clock is a guide: collagen-rich cuts need enough covered cooking to become fork-tender. Keep the pot from drying out.
Don’t rush this one
05
Neck
Between the head and shoulder.
A working cut commonly used for a slow-cooked roast, braise or stew.
Try it at home: Slow-braise in broth until tender, then shred for sandwiches or add to stew.
From the recipe box
Tap a recipe name, eh?
Pain in Da Neck, Pleasure on Da Plate · Pot Roast with Potatoes and Carrots
Open the recipe card +
Original home-cooking draft · Not kitchen-tested. Independently authored. Playful Yooper names, not a claim of traditional regional authorship.
Pot Roast with Potatoes and Carrots
Serves: 6
Pain in Da Neck, Pleasure on Da Plate
Ingredients
3 lb boneless neck meat, in large pieces
1 tbsp neutral oil
1 tsp salt
½ tsp black pepper
1 large onion, chopped
2 garlic cloves, minced
3 cups low-sodium beef broth, plus more if needed
1 bay leaf
1½ lb potatoes, cut into 2-inch chunks
4 carrots, cut into 2-inch pieces
Directions
Heat oven to 300°F. Trim accessible silverskin and hard fat from the meat; pat dry and season with salt and pepper.
Heat oil in a Dutch oven over medium-high heat. Brown meat on all sides, in batches if needed; transfer to a plate. Soften onion in the same pot for 5 minutes; add garlic for 30 seconds.
Add broth and scrape up browned bits. Return meat and add bay leaf. Liquid should reach about halfway to two-thirds up the meat; add broth if necessary.
Cover tightly and bake 4–5½ hours, until a fork twists easily in the meat. Check liquid every hour and replenish with hot broth as needed. Begin the finishing steps below at the indicated point; timing depends on the animal and size of the cut. Confirm the meat reaches at least 165°F in the thickest part; tenderness may take longer.
Add potatoes and carrots for the final 60–75 minutes, keeping the pot covered until meat and vegetables are tender.
Remove and discard the bay leaf. If serving the meat in pieces, spoon the pot juices over it. Taste before adding any more salt.
The clock is a guide: collagen-rich cuts need enough covered cooking to become fork-tender. Keep the pot from drying out. Use professionally deboned neck meat with spinal cord and other nervous tissue excluded.
Neck Deep in Gravy · Mushroom-and-Onion Gravy
Open the recipe card +
Original home-cooking draft · Not kitchen-tested. Independently authored. Playful Yooper names, not a claim of traditional regional authorship.
Mushroom-and-Onion Gravy
Serves: 6
Neck Deep in Gravy
Ingredients
3 lb boneless neck meat, in large pieces
1 tbsp neutral oil
1 tsp salt
½ tsp black pepper
1 large onion, chopped
2 garlic cloves, minced
3 cups low-sodium beef broth, plus more if needed
1 bay leaf
12 oz mushrooms, halved
2 tbsp cornstarch
3 tbsp cold water
Directions
Heat oven to 300°F. Trim accessible silverskin and hard fat from the meat; pat dry and season with salt and pepper.
Heat oil in a Dutch oven over medium-high heat. Brown meat on all sides, in batches if needed; transfer to a plate. Soften onion in the same pot for 5 minutes; add garlic for 30 seconds.
Add broth and scrape up browned bits. Return meat and add bay leaf. Liquid should reach about halfway to two-thirds up the meat; add broth if necessary.
Cover tightly and bake 4–5½ hours, until a fork twists easily in the meat. Check liquid every hour and replenish with hot broth as needed. Begin the finishing steps below at the indicated point; timing depends on the animal and size of the cut. Confirm the meat reaches at least 165°F in the thickest part; tenderness may take longer.
Add mushrooms for the final hour. Once meat is tender, move it to a platter. Mix cornstarch with cold water; stir into the simmering pot juices and cook 2–3 minutes. Return meat to the gravy.
Remove and discard the bay leaf. If serving the meat in pieces, spoon the pot juices over it. Taste before adding any more salt.
The clock is a guide: collagen-rich cuts need enough covered cooking to become fork-tender. Keep the pot from drying out. Use professionally deboned neck meat with spinal cord and other nervous tissue excluded.
Tomatoes from Grandma’s Cupboard · Tomato-Braised Camp Supper
Open the recipe card +
Original home-cooking draft · Not kitchen-tested. Independently authored. Playful Yooper names, not a claim of traditional regional authorship.
Tomato-Braised Camp Supper
Serves: 6
Tomatoes from Grandma’s Cupboard
Ingredients
3 lb boneless neck meat, in large pieces
1 tbsp neutral oil
1 tsp salt
½ tsp black pepper
1 large onion, chopped
2 garlic cloves, minced
3 cups low-sodium beef broth, plus more if needed
1 bay leaf
1 can (14½ oz) diced tomatoes, with juices
1 tsp paprika
1 lb potatoes, cut into 2-inch chunks
Directions
Heat oven to 300°F. Trim accessible silverskin and hard fat from the meat; pat dry and season with salt and pepper.
Heat oil in a Dutch oven over medium-high heat. Brown meat on all sides, in batches if needed; transfer to a plate. Soften onion in the same pot for 5 minutes; add garlic for 30 seconds.
Add broth and scrape up browned bits. Return meat and add bay leaf. Liquid should reach about halfway to two-thirds up the meat; add broth if necessary.
Stir in the tomatoes and paprika now. Confirm the meat reaches at least 165°F in the thickest part; tenderness may take longer.
Cover tightly and bake 4–5½ hours, until a fork twists easily in the meat. Check liquid every hour and replenish with hot broth as needed. Begin the finishing steps below at the indicated point; timing depends on the animal and size of the cut.
Add potatoes for the final 60–75 minutes and cook until tender.
Remove and discard the bay leaf. If serving the meat in pieces, spoon the pot juices over it. Taste before adding any more salt.
The clock is a guide: collagen-rich cuts need enough covered cooking to become fork-tender. Keep the pot from drying out. Use professionally deboned neck meat with spinal cord and other nervous tissue excluded.
Smells Like Somebody Knows Supper · Cabbage-and-Carrot Pot
Open the recipe card +
Original home-cooking draft · Not kitchen-tested. Independently authored. Playful Yooper names, not a claim of traditional regional authorship.
Cabbage-and-Carrot Pot
Serves: 6
Smells Like Somebody Knows Supper
Ingredients
3 lb boneless neck meat, in large pieces
1 tbsp neutral oil
1 tsp salt
½ tsp black pepper
1 large onion, chopped
2 garlic cloves, minced
3 cups low-sodium beef broth, plus more if needed
1 bay leaf
½ medium green cabbage, cut into 4 wedges
3 carrots, cut into chunks
1 tbsp cider vinegar
Directions
Heat oven to 300°F. Trim accessible silverskin and hard fat from the meat; pat dry and season with salt and pepper.
Heat oil in a Dutch oven over medium-high heat. Brown meat on all sides, in batches if needed; transfer to a plate. Soften onion in the same pot for 5 minutes; add garlic for 30 seconds.
Add broth and scrape up browned bits. Return meat and add bay leaf. Liquid should reach about halfway to two-thirds up the meat; add broth if necessary.
Cover tightly and bake 4–5½ hours, until a fork twists easily in the meat. Check liquid every hour and replenish with hot broth as needed. Begin the finishing steps below at the indicated point; timing depends on the animal and size of the cut. Confirm the meat reaches at least 165°F in the thickest part; tenderness may take longer.
Add carrots for the final hour. Nestle cabbage into the liquid for the final 35–45 minutes. When vegetables and meat are tender, stir in cider vinegar.
Remove and discard the bay leaf. If serving the meat in pieces, spoon the pot juices over it. Taste before adding any more salt.
The clock is a guide: collagen-rich cuts need enough covered cooking to become fork-tender. Keep the pot from drying out. Use professionally deboned neck meat with spinal cord and other nervous tissue excluded.
Long Sit, Big Bowl · Old-School Barley Stew
Open the recipe card +
Original home-cooking draft · Not kitchen-tested. Independently authored. Playful Yooper names, not a claim of traditional regional authorship.
Old-School Barley Stew
Serves: 6
Long Sit, Big Bowl
Ingredients
3 lb boneless neck meat, in large pieces
1 tbsp neutral oil
1 tsp salt
½ tsp black pepper
1 large onion, chopped
2 garlic cloves, minced
3 cups low-sodium beef broth, plus more if needed
1 bay leaf
¾ cup pearl barley, rinsed
3 carrots, diced
2 celery stalks, diced
3 cups additional low-sodium beef broth
Directions
Heat oven to 300°F. Trim accessible silverskin and hard fat from the meat; pat dry and season with salt and pepper.
Heat oil in a Dutch oven over medium-high heat. Brown meat on all sides, in batches if needed; transfer to a plate. Soften onion in the same pot for 5 minutes; add garlic for 30 seconds.
Add broth and scrape up browned bits. Return meat and add bay leaf. Liquid should reach about halfway to two-thirds up the meat; add broth if necessary.
Cover tightly and bake 4–5½ hours, until a fork twists easily in the meat. Check liquid every hour and replenish with hot broth as needed. Begin the finishing steps below at the indicated point; timing depends on the animal and size of the cut. Confirm the meat reaches at least 165°F in the thickest part; tenderness may take longer.
When the meat is tender, remove it and cut or shred into bite-size pieces. Add extra broth, barley, carrots and celery to the pot. Simmer gently, covered, 45–60 minutes until barley is tender. Return meat and heat the whole stew to 165°F.
Remove and discard the bay leaf. If serving the meat in pieces, spoon the pot juices over it. Taste before adding any more salt.
The clock is a guide: collagen-rich cuts need enough covered cooking to become fork-tender. Keep the pot from drying out. Use professionally deboned neck meat with spinal cord and other nervous tissue excluded.
Quit Lifting Da Lid, Bud · Stew with Drop Dumplings
Open the recipe card +
Original home-cooking draft · Not kitchen-tested. Independently authored. Playful Yooper names, not a claim of traditional regional authorship.
Stew with Drop Dumplings
Serves: 6
Quit Lifting Da Lid, Bud
Ingredients
3 lb boneless neck meat, in large pieces
1 tbsp neutral oil
1 tsp salt
½ tsp black pepper
1 large onion, chopped
2 garlic cloves, minced
3 cups low-sodium beef broth, plus more if needed
1 bay leaf
3 carrots, sliced
1 cup frozen peas
1 cup all-purpose flour
1½ tsp baking powder
¼ tsp salt for dumplings
½ cup milk
1 tbsp melted butter
Directions
Heat oven to 300°F. Trim accessible silverskin and hard fat from the meat; pat dry and season with salt and pepper.
Heat oil in a Dutch oven over medium-high heat. Brown meat on all sides, in batches if needed; transfer to a plate. Soften onion in the same pot for 5 minutes; add garlic for 30 seconds.
Add broth and scrape up browned bits. Return meat and add bay leaf. Liquid should reach about halfway to two-thirds up the meat; add broth if necessary.
Cover tightly and bake 4–5½ hours, until a fork twists easily in the meat. Check liquid every hour and replenish with hot broth as needed. Begin the finishing steps below at the indicated point; timing depends on the animal and size of the cut. Confirm the meat reaches at least 165°F in the thickest part; tenderness may take longer.
Add carrots during the final hour of braising. When meat is tender, remove it and cut or shred. Return meat to the pot with peas; bring to a gentle stovetop simmer.
Mix flour, baking powder and dumpling salt. Stir in milk and melted butter just until combined. Drop 8 small spoonfuls onto the simmering stew. Cover tightly and simmer gently for 15–18 minutes without lifting the lid. Split one dumpling to check that the center is fluffy, not wet dough; cook a few minutes longer if needed. Heat stew to 165°F.
Remove and discard the bay leaf. If serving the meat in pieces, spoon the pot juices over it. Taste before adding any more salt. Check that the center of the largest dumpling reaches 165°F before serving.
The clock is a guide: collagen-rich cuts need enough covered cooking to become fork-tender. Keep the pot from drying out. Use professionally deboned neck meat with spinal cord and other nervous tissue excluded.
Da Neck Gets a Bun · Pulled Venison Sandwiches
Open the recipe card +
Original home-cooking draft · Not kitchen-tested. Independently authored. Playful Yooper names, not a claim of traditional regional authorship.
Pulled Venison Sandwiches
Serves: 6
Da Neck Gets a Bun
Ingredients
3 lb boneless neck meat, in large pieces
1 tbsp neutral oil
1 tsp salt
½ tsp black pepper
1 large onion, chopped
2 garlic cloves, minced
3 cups low-sodium beef broth, plus more if needed
1 bay leaf
¾ cup barbecue sauce
1 tbsp cider vinegar
6 sandwich buns
Directions
Heat oven to 300°F. Trim accessible silverskin and hard fat from the meat; pat dry and season with salt and pepper.
Heat oil in a Dutch oven over medium-high heat. Brown meat on all sides, in batches if needed; transfer to a plate. Soften onion in the same pot for 5 minutes; add garlic for 30 seconds.
Add broth and scrape up browned bits. Return meat and add bay leaf. Liquid should reach about halfway to two-thirds up the meat; add broth if necessary.
Cover tightly and bake 4–5½ hours, until a fork twists easily in the meat. Check liquid every hour and replenish with hot broth as needed. Begin the finishing steps below at the indicated point; timing depends on the animal and size of the cut. Confirm the meat reaches at least 165°F in the thickest part; tenderness may take longer.
When meat is fork-tender, lift it out and discard any bones and tough connective pieces. Shred the meat.
Mix meat with barbecue sauce, vinegar and ½ cup cooking liquid. Heat gently to 165°F, adding more cooking liquid if needed. Divide among buns. Save or freeze extra cooking liquid separately.
Remove and discard the bay leaf. If serving the meat in pieces, spoon the pot juices over it. Taste before adding any more salt.
The clock is a guide: collagen-rich cuts need enough covered cooking to become fork-tender. Keep the pot from drying out. Use professionally deboned neck meat with spinal cord and other nervous tissue excluded.
Let the pot do the work
06
Shanks
The lower front and rear legs.
Rich in connective tissue. A slow braise can soften it; meat can also be trimmed for grinding.
Try it at home: Braise covered with vegetables and broth until the connective tissue softens and the meat is tender.
From the recipe box
Tap a recipe name, eh?
Tough Old Buck, Tender Old Supper · Pot Roast with Potatoes and Carrots
Open the recipe card +
Original home-cooking draft · Not kitchen-tested. Independently authored. Playful Yooper names, not a claim of traditional regional authorship.
Pot Roast with Potatoes and Carrots
Serves: 6
Tough Old Buck, Tender Old Supper
Ingredients
4 lb bone-in venison shanks, in pieces that fit the pot
1 tbsp neutral oil
1 tsp salt
½ tsp black pepper
1 large onion, chopped
2 garlic cloves, minced
3 cups low-sodium beef broth, plus more if needed
1 bay leaf
1½ lb potatoes, cut into 2-inch chunks
4 carrots, cut into 2-inch pieces
Directions
Heat oven to 300°F. Trim accessible silverskin and hard fat from the meat; pat dry and season with salt and pepper. Leave shank connective tissue attached for the long braise.
Heat oil in a Dutch oven over medium-high heat. Brown meat on all sides, in batches if needed; transfer to a plate. Soften onion in the same pot for 5 minutes; add garlic for 30 seconds.
Add broth and scrape up browned bits. Return meat and add bay leaf. Liquid should reach about halfway to two-thirds up the meat; add broth if necessary.
Cover tightly and bake 4–5½ hours, until a fork twists easily in the meat. Check liquid every hour and replenish with hot broth as needed. Begin the finishing steps below at the indicated point; timing depends on the animal and size of the cut. Confirm the meat reaches at least 165°F in the thickest part, away from bone; tenderness may take longer.
Add potatoes and carrots for the final 60–75 minutes, keeping the pot covered until meat and vegetables are tender.
Remove and discard the bay leaf. If serving meat whole, remove bones before portioning and spoon the pot juices over it. Taste before adding any more salt.
The clock is a guide: collagen-rich cuts need enough covered cooking to become fork-tender. Keep the pot from drying out.
Gravy Boots Optional · Mushroom-and-Onion Gravy
Open the recipe card +
Original home-cooking draft · Not kitchen-tested. Independently authored. Playful Yooper names, not a claim of traditional regional authorship.
Mushroom-and-Onion Gravy
Serves: 6
Gravy Boots Optional
Ingredients
4 lb bone-in venison shanks, in pieces that fit the pot
1 tbsp neutral oil
1 tsp salt
½ tsp black pepper
1 large onion, chopped
2 garlic cloves, minced
3 cups low-sodium beef broth, plus more if needed
1 bay leaf
12 oz mushrooms, halved
2 tbsp cornstarch
3 tbsp cold water
Directions
Heat oven to 300°F. Trim accessible silverskin and hard fat from the meat; pat dry and season with salt and pepper. Leave shank connective tissue attached for the long braise.
Heat oil in a Dutch oven over medium-high heat. Brown meat on all sides, in batches if needed; transfer to a plate. Soften onion in the same pot for 5 minutes; add garlic for 30 seconds.
Add broth and scrape up browned bits. Return meat and add bay leaf. Liquid should reach about halfway to two-thirds up the meat; add broth if necessary.
Cover tightly and bake 4–5½ hours, until a fork twists easily in the meat. Check liquid every hour and replenish with hot broth as needed. Begin the finishing steps below at the indicated point; timing depends on the animal and size of the cut. Confirm the meat reaches at least 165°F in the thickest part, away from bone; tenderness may take longer.
Add mushrooms for the final hour. Once meat is tender, move it to a platter. Mix cornstarch with cold water; stir into the simmering pot juices and cook 2–3 minutes. Return meat to the gravy.
Remove and discard the bay leaf. If serving meat whole, remove bones before portioning and spoon the pot juices over it. Taste before adding any more salt.
The clock is a guide: collagen-rich cuts need enough covered cooking to become fork-tender. Keep the pot from drying out.
Red Sauce, White Long Johns · Tomato-Braised Camp Supper
Open the recipe card +
Original home-cooking draft · Not kitchen-tested. Independently authored. Playful Yooper names, not a claim of traditional regional authorship.
Tomato-Braised Camp Supper
Serves: 6
Red Sauce, White Long Johns
Ingredients
4 lb bone-in venison shanks, in pieces that fit the pot
1 tbsp neutral oil
1 tsp salt
½ tsp black pepper
1 large onion, chopped
2 garlic cloves, minced
3 cups low-sodium beef broth, plus more if needed
1 bay leaf
1 can (14½ oz) diced tomatoes, with juices
1 tsp paprika
1 lb potatoes, cut into 2-inch chunks
Directions
Heat oven to 300°F. Trim accessible silverskin and hard fat from the meat; pat dry and season with salt and pepper. Leave shank connective tissue attached for the long braise.
Heat oil in a Dutch oven over medium-high heat. Brown meat on all sides, in batches if needed; transfer to a plate. Soften onion in the same pot for 5 minutes; add garlic for 30 seconds.
Add broth and scrape up browned bits. Return meat and add bay leaf. Liquid should reach about halfway to two-thirds up the meat; add broth if necessary.
Stir in the tomatoes and paprika now. Confirm the meat reaches at least 165°F in the thickest part, away from bone; tenderness may take longer.
Cover tightly and bake 4–5½ hours, until a fork twists easily in the meat. Check liquid every hour and replenish with hot broth as needed. Begin the finishing steps below at the indicated point; timing depends on the animal and size of the cut.
Add potatoes for the final 60–75 minutes and cook until tender.
Remove and discard the bay leaf. If serving meat whole, remove bones before portioning and spoon the pot juices over it. Taste before adding any more salt.
The clock is a guide: collagen-rich cuts need enough covered cooking to become fork-tender. Keep the pot from drying out.
Camp Perfume · Cabbage-and-Carrot Pot
Open the recipe card +
Original home-cooking draft · Not kitchen-tested. Independently authored. Playful Yooper names, not a claim of traditional regional authorship.
Cabbage-and-Carrot Pot
Serves: 6
Camp Perfume
Ingredients
4 lb bone-in venison shanks, in pieces that fit the pot
1 tbsp neutral oil
1 tsp salt
½ tsp black pepper
1 large onion, chopped
2 garlic cloves, minced
3 cups low-sodium beef broth, plus more if needed
1 bay leaf
½ medium green cabbage, cut into 4 wedges
3 carrots, cut into chunks
1 tbsp cider vinegar
Directions
Heat oven to 300°F. Trim accessible silverskin and hard fat from the meat; pat dry and season with salt and pepper. Leave shank connective tissue attached for the long braise.
Heat oil in a Dutch oven over medium-high heat. Brown meat on all sides, in batches if needed; transfer to a plate. Soften onion in the same pot for 5 minutes; add garlic for 30 seconds.
Add broth and scrape up browned bits. Return meat and add bay leaf. Liquid should reach about halfway to two-thirds up the meat; add broth if necessary.
Cover tightly and bake 4–5½ hours, until a fork twists easily in the meat. Check liquid every hour and replenish with hot broth as needed. Begin the finishing steps below at the indicated point; timing depends on the animal and size of the cut. Confirm the meat reaches at least 165°F in the thickest part, away from bone; tenderness may take longer.
Add carrots for the final hour. Nestle cabbage into the liquid for the final 35–45 minutes. When vegetables and meat are tender, stir in cider vinegar.
Remove and discard the bay leaf. If serving meat whole, remove bones before portioning and spoon the pot juices over it. Taste before adding any more salt.
The clock is a guide: collagen-rich cuts need enough covered cooking to become fork-tender. Keep the pot from drying out.
Been Cookin’ Longer Than You Sat · Old-School Barley Stew
Open the recipe card +
Original home-cooking draft · Not kitchen-tested. Independently authored. Playful Yooper names, not a claim of traditional regional authorship.
Old-School Barley Stew
Serves: 6
Been Cookin’ Longer Than You Sat
Ingredients
4 lb bone-in venison shanks, in pieces that fit the pot
1 tbsp neutral oil
1 tsp salt
½ tsp black pepper
1 large onion, chopped
2 garlic cloves, minced
3 cups low-sodium beef broth, plus more if needed
1 bay leaf
¾ cup pearl barley, rinsed
3 carrots, diced
2 celery stalks, diced
3 cups additional low-sodium beef broth
Directions
Heat oven to 300°F. Trim accessible silverskin and hard fat from the meat; pat dry and season with salt and pepper. Leave shank connective tissue attached for the long braise.
Heat oil in a Dutch oven over medium-high heat. Brown meat on all sides, in batches if needed; transfer to a plate. Soften onion in the same pot for 5 minutes; add garlic for 30 seconds.
Add broth and scrape up browned bits. Return meat and add bay leaf. Liquid should reach about halfway to two-thirds up the meat; add broth if necessary.
Cover tightly and bake 4–5½ hours, until a fork twists easily in the meat. Check liquid every hour and replenish with hot broth as needed. Begin the finishing steps below at the indicated point; timing depends on the animal and size of the cut. Confirm the meat reaches at least 165°F in the thickest part, away from bone; tenderness may take longer.
When the meat is tender, remove it, discard bones if present, and cut or shred into bite-size pieces. Add extra broth, barley, carrots and celery to the pot. Simmer gently, covered, 45–60 minutes until barley is tender. Return meat and heat the whole stew to 165°F.
Remove and discard the bay leaf. If serving meat whole, remove bones before portioning and spoon the pot juices over it. Taste before adding any more salt.
The clock is a guide: collagen-rich cuts need enough covered cooking to become fork-tender. Keep the pot from drying out.
Fork-Tender, Unlike Da Mattress · Stew with Drop Dumplings
Open the recipe card +
Original home-cooking draft · Not kitchen-tested. Independently authored. Playful Yooper names, not a claim of traditional regional authorship.
Stew with Drop Dumplings
Serves: 6
Fork-Tender, Unlike Da Mattress
Ingredients
4 lb bone-in venison shanks, in pieces that fit the pot
1 tbsp neutral oil
1 tsp salt
½ tsp black pepper
1 large onion, chopped
2 garlic cloves, minced
3 cups low-sodium beef broth, plus more if needed
1 bay leaf
3 carrots, sliced
1 cup frozen peas
1 cup all-purpose flour
1½ tsp baking powder
¼ tsp salt for dumplings
½ cup milk
1 tbsp melted butter
Directions
Heat oven to 300°F. Trim accessible silverskin and hard fat from the meat; pat dry and season with salt and pepper. Leave shank connective tissue attached for the long braise.
Heat oil in a Dutch oven over medium-high heat. Brown meat on all sides, in batches if needed; transfer to a plate. Soften onion in the same pot for 5 minutes; add garlic for 30 seconds.
Add broth and scrape up browned bits. Return meat and add bay leaf. Liquid should reach about halfway to two-thirds up the meat; add broth if necessary.
Cover tightly and bake 4–5½ hours, until a fork twists easily in the meat. Check liquid every hour and replenish with hot broth as needed. Begin the finishing steps below at the indicated point; timing depends on the animal and size of the cut. Confirm the meat reaches at least 165°F in the thickest part, away from bone; tenderness may take longer.
Add carrots during the final hour of braising. When meat is tender, remove it, discard bones if present, and cut or shred. Return meat to the pot with peas; bring to a gentle stovetop simmer.
Mix flour, baking powder and dumpling salt. Stir in milk and melted butter just until combined. Drop 8 small spoonfuls onto the simmering stew. Cover tightly and simmer gently for 15–18 minutes without lifting the lid. Split one dumpling to check that the center is fluffy, not wet dough; cook a few minutes longer if needed. Heat stew to 165°F.
Remove and discard the bay leaf. If serving meat whole, remove bones before portioning and spoon the pot juices over it. Taste before adding any more salt. Check that the center of the largest dumpling reaches 165°F before serving.
The clock is a guide: collagen-rich cuts need enough covered cooking to become fork-tender. Keep the pot from drying out.
Shanks for Supper, Eh? · Pulled Venison Sandwiches
Open the recipe card +
Original home-cooking draft · Not kitchen-tested. Independently authored. Playful Yooper names, not a claim of traditional regional authorship.
Pulled Venison Sandwiches
Serves: 6
Shanks for Supper, Eh?
Ingredients
4 lb bone-in venison shanks, in pieces that fit the pot
1 tbsp neutral oil
1 tsp salt
½ tsp black pepper
1 large onion, chopped
2 garlic cloves, minced
3 cups low-sodium beef broth, plus more if needed
1 bay leaf
¾ cup barbecue sauce
1 tbsp cider vinegar
6 sandwich buns
Directions
Heat oven to 300°F. Trim accessible silverskin and hard fat from the meat; pat dry and season with salt and pepper. Leave shank connective tissue attached for the long braise.
Heat oil in a Dutch oven over medium-high heat. Brown meat on all sides, in batches if needed; transfer to a plate. Soften onion in the same pot for 5 minutes; add garlic for 30 seconds.
Add broth and scrape up browned bits. Return meat and add bay leaf. Liquid should reach about halfway to two-thirds up the meat; add broth if necessary.
Cover tightly and bake 4–5½ hours, until a fork twists easily in the meat. Check liquid every hour and replenish with hot broth as needed. Begin the finishing steps below at the indicated point; timing depends on the animal and size of the cut. Confirm the meat reaches at least 165°F in the thickest part, away from bone; tenderness may take longer.
When meat is fork-tender, lift it out and discard any bones and tough connective pieces. Shred the meat.
Mix meat with barbecue sauce, vinegar and ½ cup cooking liquid. Heat gently to 165°F, adding more cooking liquid if needed. Divide among buns. Save or freeze extra cooking liquid separately.
Remove and discard the bay leaf. If serving meat whole, remove bones before portioning and spoon the pot juices over it. Taste before adding any more salt.
The clock is a guide: collagen-rich cuts need enough covered cooking to become fork-tender. Keep the pot from drying out.
Big flavor. No fuss.
07
Flank & ribs
The belly and rib area.
Thin areas with variable yield. This guide explains the anatomy; it does not add processing selections.
Try it at home: If included in your finished meat, slow, moist cooking suits these lean, working areas. Cook only clean, properly processed meat.
From the recipe box
Tap a recipe name, eh?
Quit Grinding Everything, Bud · Thin-Sliced Flank with Onions
Open the recipe card +
Original home-cooking draft · Not kitchen-tested. Independently authored. Playful Yooper names, not a claim of traditional regional authorship.
Thin-Sliced Flank with Onions
Serves: 4
Quit Grinding Everything, Bud
Ingredients
1½ lb trimmed venison flank
1 large onion, thinly sliced
2 tbsp neutral oil
¾ tsp salt
½ tsp black pepper
½ cup low-sodium beef broth
1 tbsp Worcestershire sauce
Directions
Find the direction of the meat grain, then slice across it as thinly as possible, about ⅛ inch. Season with salt and pepper.
Heat 1 tbsp oil in a skillet over medium heat. Cook onion 10–12 minutes until soft; transfer to a bowl.
Heat remaining oil over medium-high heat. Cook meat in small batches, turning until browned and 165°F in the thickest slices. Transfer to a clean plate.
Add broth and Worcestershire to the pan, scrape up browned bits and simmer 2 minutes. Return onions; spoon over meat. Serve immediately.
No Delivery This Far Out · Flank and Pepper Sandwiches
Open the recipe card +
Original home-cooking draft · Not kitchen-tested. Independently authored. Playful Yooper names, not a claim of traditional regional authorship.
Flank and Pepper Sandwiches
Serves: 4
No Delivery This Far Out
Ingredients
1½ lb trimmed venison flank
1 onion, sliced
1 green bell pepper, sliced
2 tbsp neutral oil
¾ tsp salt
½ tsp black pepper
½ cup low-sodium beef broth
4 sandwich rolls
4 slices provolone
Directions
Slice flank across the grain into very thin strips. Season with salt and pepper.
Soften onion and pepper in 1 tbsp oil over medium heat for 10 minutes; remove to a plate.
Add remaining oil and cook meat in small batches over medium-high heat until browned and 165°F. Remove to a clean plate. Add broth and scrape the pan; simmer 1 minute.
Return vegetables to the broth and divide them and the meat among split rolls. Top with cheese and broil briefly, watching closely, until melted.
Deer Camp Went Out for Breakfast · Flank Steak and Fried Potatoes
Open the recipe card +
Original home-cooking draft · Not kitchen-tested. Independently authored. Playful Yooper names, not a claim of traditional regional authorship.
Flank Steak and Fried Potatoes
Serves: 4
Deer Camp Went Out for Breakfast
Ingredients
1¼ lb trimmed venison flank
1½ lb potatoes, cut into ½-inch cubes
1 onion, diced
3 tbsp neutral oil, divided
1 tsp salt, divided
½ tsp black pepper
1 tbsp butter
Directions
Boil potatoes in water for 7–9 minutes until just tender; drain and let steam-dry.
Heat 2 tbsp oil in a skillet. Fry potatoes and onion over medium heat for 12–15 minutes, turning occasionally, until browned. Season with ½ tsp salt; transfer to a warm serving dish.
Slice flank thinly across the grain. Season with remaining salt and pepper. Heat remaining oil and cook meat in small batches until browned and 165°F.
Melt butter over the cooked meat and spoon onto potatoes. Serve right away.
Ribs That Stay Off Da Dog’s Plate · Pot Roast with Potatoes and Carrots
Open the recipe card +
Original home-cooking draft · Not kitchen-tested. Independently authored. Playful Yooper names, not a claim of traditional regional authorship.
Pot Roast with Potatoes and Carrots
Serves: 4
Ribs That Stay Off Da Dog’s Plate
Ingredients
3½ lb meaty venison ribs, cut to fit the pot
1 tbsp neutral oil
1 tsp salt
½ tsp black pepper
1 large onion, chopped
2 garlic cloves, minced
3 cups low-sodium beef broth, plus more if needed
1 bay leaf
1½ lb potatoes, cut into 2-inch chunks
4 carrots, cut into 2-inch pieces
Directions
Heat oven to 300°F. Trim accessible silverskin and hard fat from the meat; pat dry and season with salt and pepper.
Heat oil in a Dutch oven over medium-high heat. Brown meat on all sides, in batches if needed; transfer to a plate. Soften onion in the same pot for 5 minutes; add garlic for 30 seconds.
Add broth and scrape up browned bits. Return meat and add bay leaf. Liquid should reach about halfway to two-thirds up the meat; add broth if necessary.
Cover tightly and bake 3–4½ hours, until a fork twists easily in the meat. Check liquid every hour and replenish with hot broth as needed. Begin the finishing steps below at the indicated point; timing depends on the animal and size of the cut. Confirm the meat reaches at least 165°F in the thickest part, away from bone; tenderness may take longer.
Add potatoes and carrots for the final 60–75 minutes, keeping the pot covered until meat and vegetables are tender.
Remove and discard the bay leaf. If serving meat whole, remove bones before portioning and spoon the pot juices over it. Taste before adding any more salt.
The clock is a guide: collagen-rich cuts need enough covered cooking to become fork-tender. Keep the pot from drying out.
Bring Napkins, Not Excuses · Pulled Venison Sandwiches
Open the recipe card +
Original home-cooking draft · Not kitchen-tested. Independently authored. Playful Yooper names, not a claim of traditional regional authorship.
Pulled Venison Sandwiches
Serves: 4
Bring Napkins, Not Excuses
Ingredients
3½ lb meaty venison ribs, cut to fit the pot
1 tbsp neutral oil
1 tsp salt
½ tsp black pepper
1 large onion, chopped
2 garlic cloves, minced
3 cups low-sodium beef broth, plus more if needed
1 bay leaf
¾ cup barbecue sauce
1 tbsp cider vinegar
6 sandwich buns
Directions
Heat oven to 300°F. Trim accessible silverskin and hard fat from the meat; pat dry and season with salt and pepper.
Heat oil in a Dutch oven over medium-high heat. Brown meat on all sides, in batches if needed; transfer to a plate. Soften onion in the same pot for 5 minutes; add garlic for 30 seconds.
Add broth and scrape up browned bits. Return meat and add bay leaf. Liquid should reach about halfway to two-thirds up the meat; add broth if necessary.
Cover tightly and bake 3–4½ hours, until a fork twists easily in the meat. Check liquid every hour and replenish with hot broth as needed. Begin the finishing steps below at the indicated point; timing depends on the animal and size of the cut. Confirm the meat reaches at least 165°F in the thickest part, away from bone; tenderness may take longer.
When meat is fork-tender, lift it out and discard any bones and tough connective pieces. Shred the meat.
Mix meat with barbecue sauce, vinegar and ½ cup cooking liquid. Heat gently to 165°F, adding more cooking liquid if needed. Divide among buns. Save or freeze extra cooking liquid separately.
Remove and discard the bay leaf. If serving meat whole, remove bones before portioning and spoon the pot juices over it. Taste before adding any more salt.
The clock is a guide: collagen-rich cuts need enough covered cooking to become fork-tender. Keep the pot from drying out.
Da Cabbage Has Entered Da Chat · Cabbage-and-Carrot Pot
Open the recipe card +
Original home-cooking draft · Not kitchen-tested. Independently authored. Playful Yooper names, not a claim of traditional regional authorship.
Cabbage-and-Carrot Pot
Serves: 4
Da Cabbage Has Entered Da Chat
Ingredients
3½ lb meaty venison ribs, cut to fit the pot
1 tbsp neutral oil
1 tsp salt
½ tsp black pepper
1 large onion, chopped
2 garlic cloves, minced
3 cups low-sodium beef broth, plus more if needed
1 bay leaf
½ medium green cabbage, cut into 4 wedges
3 carrots, cut into chunks
1 tbsp cider vinegar
Directions
Heat oven to 300°F. Trim accessible silverskin and hard fat from the meat; pat dry and season with salt and pepper.
Heat oil in a Dutch oven over medium-high heat. Brown meat on all sides, in batches if needed; transfer to a plate. Soften onion in the same pot for 5 minutes; add garlic for 30 seconds.
Add broth and scrape up browned bits. Return meat and add bay leaf. Liquid should reach about halfway to two-thirds up the meat; add broth if necessary.
Cover tightly and bake 3–4½ hours, until a fork twists easily in the meat. Check liquid every hour and replenish with hot broth as needed. Begin the finishing steps below at the indicated point; timing depends on the animal and size of the cut. Confirm the meat reaches at least 165°F in the thickest part, away from bone; tenderness may take longer.
Add carrots for the final hour. Nestle cabbage into the liquid for the final 35–45 minutes. When vegetables and meat are tender, stir in cider vinegar.
Remove and discard the bay leaf. If serving meat whole, remove bones before portioning and spoon the pot juices over it. Taste before adding any more salt.
The clock is a guide: collagen-rich cuts need enough covered cooking to become fork-tender. Keep the pot from drying out.
Beans, Ribs, and Poor Ventilation · Rib Meat and Beans
Open the recipe card +
Original home-cooking draft · Not kitchen-tested. Independently authored. Playful Yooper names, not a claim of traditional regional authorship.
Rib Meat and Beans
Serves: 4
Beans, Ribs, and Poor Ventilation
Ingredients
3½ lb meaty venison ribs, cut to fit the pot
1 tbsp neutral oil
1 tsp salt
½ tsp black pepper
1 large onion, chopped
2 garlic cloves, minced
3 cups low-sodium beef broth, plus more if needed
1 bay leaf
2 cans (15 oz each) navy beans, drained and rinsed
1 can (14½ oz) diced tomatoes
1 tbsp brown sugar
1 tbsp yellow mustard
Directions
Heat oven to 300°F. Trim accessible silverskin and hard fat from the meat; pat dry and season with salt and pepper.
Heat oil in a Dutch oven over medium-high heat. Brown meat on all sides, in batches if needed; transfer to a plate. Soften onion in the same pot for 5 minutes; add garlic for 30 seconds.
Add broth and scrape up browned bits. Return meat and add bay leaf. Liquid should reach about halfway to two-thirds up the meat; add broth if necessary.
Cover tightly and bake 3–4½ hours, until a fork twists easily in the meat. Check liquid every hour and replenish with hot broth as needed. Begin the finishing steps below at the indicated point; timing depends on the animal and size of the cut. Confirm the meat reaches at least 165°F in the thickest part, away from bone; tenderness may take longer.
When ribs are tender, remove the bones and shred the meat. Stir meat, beans, tomatoes, brown sugar and mustard into the pot. Simmer uncovered 20–25 minutes, stirring, until thick and 165°F.
Remove and discard the bay leaf. If serving meat whole, remove bones before portioning and spoon the pot juices over it. Taste before adding any more salt.
The clock is a guide: collagen-rich cuts need enough covered cooking to become fork-tender. Keep the pot from drying out.
Feed the whole camp.
08
Trim / ground venison
Usable trimmings from the other cuts.
Ground meat works for burgers, tacos and chili. Ground venison is versatile and cooks quickly.
Try it at home: Use ground venison in tacos, burgers or chili. A little oil helps lean meat brown without sticking; cook to 165°F.
From the recipe box
Tap a recipe name, eh?
Da Burger’s Got More Layers Than You · Onion Burgers
Open the recipe card +
Original home-cooking draft · Not kitchen-tested. Independently authored. Playful Yooper names, not a claim of traditional regional authorship.
Onion Burgers
Serves: 4
Da Burger’s Got More Layers Than You
Ingredients
1½ lb ground venison
1 large onion, thinly sliced
2 tbsp neutral oil, divided
¾ tsp salt
½ tsp black pepper
4 burger buns
4 cheese slices, optional
Directions
Cook onion in 1 tbsp oil over medium heat for 12–15 minutes until soft and golden. Transfer to a bowl.
Gently shape venison into 4 patties about ¾ inch thick; season both sides.
Heat remaining oil in the skillet over medium heat. Cook burgers about 4–6 minutes per side, checking that centers reach 165°F; time depends on thickness.
Add cheese, if using, during the last minute. Serve in buns with the onions. Do not press burgers flat while cooking.
That Ain’t a Doorstop, Bud · Moist Camp Meatloaf
Open the recipe card +
Original home-cooking draft · Not kitchen-tested. Independently authored. Playful Yooper names, not a claim of traditional regional authorship.
Moist Camp Meatloaf
Serves: 6
That Ain’t a Doorstop, Bud
Ingredients
2 lb ground venison
1 cup plain breadcrumbs
¾ cup milk
2 eggs
1 small onion, finely grated
1 tbsp Worcestershire sauce
1 tsp salt
½ tsp pepper
½ cup ketchup
1 tbsp brown sugar
Directions
Heat oven to 350°F. Soak breadcrumbs in milk for 5 minutes.
Mix eggs, onion, Worcestershire, salt and pepper into the crumbs. Gently combine with venison.
Shape a loaf about 9 by 5 inches on a rimmed baking sheet. Mix ketchup and brown sugar and spread on top.
Bake about 55–75 minutes until the center reaches 165°F. Rest 10 minutes before slicing.
Church Basement Fancy · Venison Meatballs in Cream Gravy
Open the recipe card +
Original home-cooking draft · Not kitchen-tested. Independently authored. Playful Yooper names, not a claim of traditional regional authorship.
Venison Meatballs in Cream Gravy
Serves: 6
Church Basement Fancy
Ingredients
2 lb ground venison
¾ cup breadcrumbs
½ cup milk
1 egg
1 tsp salt
½ tsp pepper
½ tsp onion powder
2 tbsp butter
2 tbsp flour
2 cups low-sodium beef broth
½ cup sour cream
Directions
Heat oven to 400°F. Soak crumbs in milk for 5 minutes, then mix with egg, salt, pepper and onion powder. Gently mix in venison.
Shape into about 28 golf-ball-size meatballs. Arrange on a rimmed baking sheet and bake 18–25 minutes, until centers reach 165°F.
Melt butter in a saucepan. Stir in flour for 1 minute; slowly whisk in broth. Simmer 5 minutes.
Remove sauce from heat. Stir a few spoonfuls into sour cream, then add that mixture to the sauce. Add hot meatballs and serve; do not boil the sour cream.
Gonna Need Another Log on Da Fire · Basic Deer-Camp Chili
Open the recipe card +
Original home-cooking draft · Not kitchen-tested. Independently authored. Playful Yooper names, not a claim of traditional regional authorship.
Basic Deer-Camp Chili
Serves: 6
Gonna Need Another Log on Da Fire
Ingredients
2 lb ground venison
1 tbsp oil
1 onion, diced
1 green bell pepper, diced
2 tbsp mild chili powder
1 tsp ground cumin
1 tsp salt
1 can (28 oz) crushed tomatoes
2 cans (15 oz each) kidney beans, drained and rinsed
1 cup water
Directions
Heat oil in a Dutch oven. Cook onion and pepper over medium heat for 6 minutes.
Add venison and break into small pieces. Cook until no raw patches remain and meat reaches 165°F.
Stir in chili powder, cumin and salt for 30 seconds. Add tomatoes, beans and water.
Simmer gently, partly covered, for 35–45 minutes, stirring occasionally. Add water if too thick. Stir and check that the finished chili reaches 165°F before serving.
Wear Your Other Shirt for This · Sloppy Does
Open the recipe card +
Original home-cooking draft · Not kitchen-tested. Independently authored. Playful Yooper names, not a claim of traditional regional authorship.
Sloppy Does
Serves: 6
Wear Your Other Shirt for This
Ingredients
1½ lb ground venison
1 tbsp oil
1 onion, diced
½ green bell pepper, diced
¾ cup ketchup
½ cup water
1 tbsp yellow mustard
1 tbsp brown sugar
1 tbsp Worcestershire sauce
½ tsp salt
6 sandwich buns
Directions
Heat oil in a skillet. Soften onion and pepper for 6 minutes.
Add venison; crumble and cook until it reaches 165°F.
Stir in ketchup, water, mustard, sugar, Worcestershire and salt. Simmer uncovered 12–15 minutes until thick enough to mound on a spoon.
Divide among buns. Hand out napkins before anybody asks.
Put a Potato Hat on It · Venison Cottage Pie
Open the recipe card +
Original home-cooking draft · Not kitchen-tested. Independently authored. Playful Yooper names, not a claim of traditional regional authorship.
Venison Cottage Pie
Serves: 6
Put a Potato Hat on It
Ingredients
1½ lb ground venison
1 tbsp oil
1 onion, diced
2 carrots, finely diced
2 tbsp flour
1½ cups low-sodium beef broth
1 tbsp Worcestershire sauce
1 tsp salt, divided
1 cup frozen peas
2 lb potatoes, peeled and cut into chunks
3 tbsp butter
½ cup milk
Directions
Heat oven to 400°F. Boil potatoes for 15–20 minutes until tender, drain, and mash with butter, milk and ½ tsp salt.
Meanwhile soften onion and carrots in oil for 8 minutes. Add venison and crumble; cook to 165°F.
Stir flour into meat for 1 minute. Add broth, Worcestershire, remaining salt and peas. Simmer 5 minutes until thick.
Transfer to a 2½-quart baking dish. Spread potatoes on top and bake 20–30 minutes until bubbling and the center reaches 165°F.
Da Pasty Didn’t Pack Itself · Ground-Venison Camp Pasties
Open the recipe card +
Original home-cooking draft · Not kitchen-tested. Independently authored. Playful Yooper names, not a claim of traditional regional authorship.
Heat oven to 375°F. Mix raw venison, potatoes, rutabaga, onion, salt and pepper in a bowl. Keep cold while preparing crusts.
Divide filling among the 6 crust rounds, placing it on one half of each and leaving a 1-inch edge. Dot each with a piece of butter.
Moisten edges with water, fold over and crimp firmly. Cut 2 steam slits in each top and brush with egg wash. Arrange on parchment-lined baking sheets.
Bake 50–65 minutes, rotating sheets halfway, until golden, vegetables are tender and filling reaches 165°F. If crust browns early, loosely tent with foil. Rest 10 minutes before eating.
Extras for the adventurous cook
Seven heart and seven tongue recipes. Informational cooking ideas only, not additional processing selections or shop services.
Heart · 7 recipes
Have a Heart, Would Ya? · Butter-and-Onion Skillet
Open the recipe card +
Original home-cooking draft · Not kitchen-tested. Independently authored. Playful Yooper names, not a claim of traditional regional authorship.
Butter-and-Onion Skillet
Serves: 4
Have a Heart, Would Ya?
Ingredients
1½ lb trimmed cleaned deer heart
¾ tsp salt
½ tsp black pepper
1 tbsp neutral oil, divided
2 tbsp butter
1 large onion, thinly sliced
1 tsp Worcestershire sauce
Directions
Split the heart open. Remove large vessels, valves, stringy cords, clots and firm fat. Use only the cleaned muscle; weigh after trimming. Remove silverskin. Cut meat across the grain into ½-inch medallions; pat dry and season with salt and pepper.
Before cooking the meat, soften onion in half the oil over medium heat for 10–12 minutes; transfer onion to a bowl.
Heat the remaining oil in a large skillet over medium-high heat. Brown meat in batches, about 1–2 minutes per side to start. Reduce heat as needed and continue until the center of each piece reaches 165°F; time varies with thickness. Transfer to a clean plate.
After removing the cooked meat, melt butter in the skillet. Add Worcestershire and the cooked onion, stir for 1 minute, and spoon over the meat.
Serve immediately; mashed potatoes or buttered noodles are good alongside.
You may need more than one deer heart for 1½ lb of cleaned meat. Cook heart to at least 165°F. Do not use organs from a lead-shot wound area or organs contaminated by bullet fragments. Cooking does not remove lead.
Ya Missed Three Times—Don’t Burn Supper · Cracker-Crumb Cutlets
Open the recipe card +
Original home-cooking draft · Not kitchen-tested. Independently authored. Playful Yooper names, not a claim of traditional regional authorship.
Cracker-Crumb Cutlets
Serves: 4
Ya Missed Three Times—Don’t Burn Supper
Ingredients
1½ lb trimmed cleaned deer heart
¾ tsp salt
½ tsp black pepper
1 tbsp neutral oil
½ cup flour
1 egg
2 tbsp milk
1 cup finely crushed saltine crackers
3 tbsp additional neutral oil
Directions
Split the heart open. Remove large vessels, valves, stringy cords, clots and firm fat. Use only the cleaned muscle; weigh after trimming. Remove silverskin. Cut meat across the grain into ½-inch medallions; pat dry and season with salt and pepper. Pound gently to an even ¼-inch thickness.
Put flour on one plate, beat egg with milk in a bowl, and spread cracker crumbs on another plate. Coat meat in flour, then egg, then crumbs.
Heat all 4 tbsp oil in a large skillet over medium heat. Fry in uncrowded batches, starting with 2–3 minutes per side, lowering heat if crumbs darken too fast. Check the centers reach 165°F.
Drain briefly on a rack and serve right away. Discard leftover coating ingredients that touched raw meat.
You may need more than one deer heart for 1½ lb of cleaned meat. Cook heart to at least 165°F. Do not use organs from a lead-shot wound area or organs contaminated by bullet fragments. Cooking does not remove lead.
Heart in Da Right Gravy · Mushroom Gravy
Open the recipe card +
Original home-cooking draft · Not kitchen-tested. Independently authored. Playful Yooper names, not a claim of traditional regional authorship.
Mushroom Gravy
Serves: 4
Heart in Da Right Gravy
Ingredients
1½ lb trimmed cleaned deer heart
¾ tsp salt
½ tsp black pepper
1 tbsp neutral oil
8 oz sliced mushrooms
2 tbsp butter
2 tbsp flour
1½ cups low-sodium beef broth
Directions
Split the heart open. Remove large vessels, valves, stringy cords, clots and firm fat. Use only the cleaned muscle; weigh after trimming. Remove silverskin. Cut meat across the grain into ½-inch medallions; pat dry and season with salt and pepper.
Heat oil in a large skillet over medium-high heat. Brown meat in batches, about 1–2 minutes per side to start. Reduce heat as needed and continue until the center of each piece reaches 165°F; time varies with thickness. Transfer to a clean plate.
After removing the cooked meat, melt butter in the same skillet. Add mushrooms and cook 6–8 minutes.
Stir in flour for 1 minute. Slowly whisk in broth, scraping the pan. Simmer 4–5 minutes until thick. Spoon gravy over the meat.
Serve immediately; mashed potatoes or buttered noodles are good alongside.
You may need more than one deer heart for 1½ lb of cleaned meat. Cook heart to at least 165°F. Do not use organs from a lead-shot wound area or organs contaminated by bullet fragments. Cooking does not remove lead.
Grandpa’s Suspicious Fridge Jar · Refrigerator-Pickled Cooked Heart
Open the recipe card +
Original home-cooking draft · Not kitchen-tested. Independently authored. Playful Yooper names, not a claim of traditional regional authorship.
Refrigerator-Pickled Cooked Heart
Serves: 6
Grandpa’s Suspicious Fridge Jar
Ingredients
1 lb cleaned deer heart
1 small onion, sliced
1 cup white vinegar labeled 5% acidity
1 cup water for pickling liquid
1 tbsp sugar
1 tsp salt
1 tsp whole black peppercorns
1 bay leaf
Water to cover heart for cooking
Directions
Split the heart open. Remove large vessels, valves, stringy cords, clots and firm fat. Use only the cleaned muscle; weigh after trimming. Cut muscle into 2-inch pieces.
Put heart in a saucepan, cover with water and bring to a simmer. Cover and simmer gently 1½–2½ hours, until tender and at least 165°F. Drain, then slice thinly.
Simmer vinegar, 1 cup water, sugar, salt, peppercorns and bay leaf for 3 minutes. Put heart and onion in a shallow heatproof food container and pour over hot liquid.
Cool promptly and refrigerate within 2 hours of cooking. Keep at 40°F or below. Let flavors develop overnight before serving.
Refrigerator food only—not a tested canning recipe and not shelf-stable. Use within 3–4 days of cooking; pickling does not reset that clock. Discard bay leaf before eating. Do not use organs from a lead-shot wound area or organs contaminated by bullet fragments. Cooking does not remove lead.
Put Your Heart into Da Pot · Heart and Potato Stew
Open the recipe card +
Original home-cooking draft · Not kitchen-tested. Independently authored. Playful Yooper names, not a claim of traditional regional authorship.
Heart and Potato Stew
Serves: 4
Put Your Heart into Da Pot
Ingredients
1½ lb cleaned deer heart
1 tbsp oil
1 onion, diced
3 cups low-sodium beef broth
1 tsp paprika
¾ tsp salt
½ tsp pepper
1 lb potatoes, cut into 1-inch pieces
2 carrots, sliced
Directions
Split the heart open. Remove large vessels, valves, stringy cords, clots and firm fat. Use only the cleaned muscle; weigh after trimming. Cut into 1-inch cubes.
Brown heart in oil in a Dutch oven, in batches. Add onion and soften for 5 minutes.
Add broth, paprika, salt and pepper. Cover and simmer gently 1½–2½ hours until nearly tender, adding water if needed.
Add potatoes and carrots and simmer covered 30–40 minutes longer, until meat and vegetables are tender. Check that both the heart and the finished stew reach 165°F.
Do not use organs from a lead-shot wound area or organs contaminated by bullet fragments. Cooking does not remove lead.
Breakfast with a Lotta Heart · Heart and Potato Hash
Open the recipe card +
Original home-cooking draft · Not kitchen-tested. Independently authored. Playful Yooper names, not a claim of traditional regional authorship.
Heart and Potato Hash
Serves: 4
Breakfast with a Lotta Heart
Ingredients
1 lb cleaned deer heart
1½ lb potatoes, cut into ½-inch cubes
1 onion, diced
3 tbsp oil, divided
¾ tsp salt
½ tsp pepper
1 tbsp butter
Directions
Split the heart open. Remove large vessels, valves, stringy cords, clots and firm fat. Use only the cleaned muscle; weigh after trimming. Slice thinly across the muscle grain, then cut into small strips.
Boil potato cubes 7–9 minutes until just tender. Drain and steam-dry.
Heat 2 tbsp oil in a large skillet. Fry potatoes and onion over medium heat 12–15 minutes until browned; season with half the salt. Transfer to a dish.
Heat remaining oil and cook heart in small batches, turning, until it reaches 165°F. Season with remaining salt and pepper. Add butter, then fold into potatoes and serve immediately.
Do not use organs from a lead-shot wound area or organs contaminated by bullet fragments. Cooking does not remove lead.
Pass Da Mustard and Mind Your Business · Braised Heart Sandwiches
Open the recipe card +
Original home-cooking draft · Not kitchen-tested. Independently authored. Playful Yooper names, not a claim of traditional regional authorship.
Braised Heart Sandwiches
Serves: 4
Pass Da Mustard and Mind Your Business
Ingredients
1½ lb cleaned deer heart
1 onion, sliced
3 cups low-sodium beef broth
½ tsp salt
½ tsp pepper
4 sandwich rolls
2 tbsp yellow mustard
8 dill pickle slices
Directions
Split the heart open. Remove large vessels, valves, stringy cords, clots and firm fat. Use only the cleaned muscle; weigh after trimming. Cut muscle into 2-inch pieces.
Place heart, onion, broth, salt and pepper in a saucepan. Bring to a gentle simmer, cover and cook 1½–2½ hours until tender and at least 165°F, replenishing liquid if needed.
Remove heart and slice thinly. Moisten slices with a few spoonfuls of hot cooking liquid.
Spread rolls with mustard. Add heart, drained onions and pickles; serve hot.
Do not use organs from a lead-shot wound area or organs contaminated by bullet fragments. Cooking does not remove lead.
Tongue · 7 recipes
Finally, Somebody at Camp Quit Yappin’ · Crisp Butter-Fried Tongue
Open the recipe card +
Original home-cooking draft · Not kitchen-tested. Independently authored. Playful Yooper names, not a claim of traditional regional authorship.
Crisp Butter-Fried Tongue
Serves: 4
Finally, Somebody at Camp Quit Yappin’
Ingredients
2 lb raw deer tongues (several tongues may be needed)
1 onion, quartered
1 bay leaf
1 tsp salt
Water to cover by 1 inch
2 tbsp butter
¼ tsp black pepper
1 tbsp flour
Directions
Start with properly cleaned, processed tongues with throat tissue, tonsils and lymph nodes removed. Do not rinse raw meat in the sink. Put tongues in a pot with onion, bay leaf, salt and water.
Bring to a boil, then reduce to a gentle simmer. Cover and cook 2–3½ hours until very tender, adding water to keep covered. Centers must reach at least 165°F; tenderness takes longer.
Lift tongues out. As soon as cool enough to handle, peel off the thick outer skin while still warm. Trim away rough tissue at the root; discard skin, trimmings, onion and bay leaf. If skin will not peel easily, simmer tongues longer.
Slice peeled tongues ¼ inch thick; pat dry and lightly dust with flour.
Melt butter over medium heat in a skillet. Fry slices 2–3 minutes per side until lightly browned, working in batches. Add pepper and serve hot.
The 2 lb is raw weight, not 2 lb peeled meat. Yield varies; these are modest four-person portions with bread or potatoes alongside. If prepared ahead, chill promptly and reheat to 165°F before hot serving.
All That Talk Made a Good Sandwich · Hot Tongue-and-Mustard Rolls
Open the recipe card +
Original home-cooking draft · Not kitchen-tested. Independently authored. Playful Yooper names, not a claim of traditional regional authorship.
Hot Tongue-and-Mustard Rolls
Serves: 4
All That Talk Made a Good Sandwich
Ingredients
2 lb raw deer tongues (several tongues may be needed)
1 onion, quartered
1 bay leaf
1 tsp salt
Water to cover by 1 inch
4 rolls
2 tbsp yellow mustard
8 pickle slices
1 tbsp butter
Directions
Start with properly cleaned, processed tongues with throat tissue, tonsils and lymph nodes removed. Do not rinse raw meat in the sink. Put tongues in a pot with onion, bay leaf, salt and water.
Bring to a boil, then reduce to a gentle simmer. Cover and cook 2–3½ hours until very tender, adding water to keep covered. Centers must reach at least 165°F; tenderness takes longer.
Lift tongues out. As soon as cool enough to handle, peel off the thick outer skin while still warm. Trim away rough tissue at the root; discard skin, trimmings, onion and bay leaf. If skin will not peel easily, simmer tongues longer.
Slice peeled tongue thinly. Keep moist in a little hot cooking liquid while preparing bread.
Butter split rolls and toast in a skillet. Spread with mustard, then add drained hot tongue and pickles. Serve immediately.
The 2 lb is raw weight, not 2 lb peeled meat. Yield varies; these are modest four-person portions with bread or potatoes alongside. If prepared ahead, chill promptly and reheat to 165°F before hot serving.
Da Only Tongue Not Telling Lies · Tongue with Onion Gravy
Open the recipe card +
Original home-cooking draft · Not kitchen-tested. Independently authored. Playful Yooper names, not a claim of traditional regional authorship.
Tongue with Onion Gravy
Serves: 4
Da Only Tongue Not Telling Lies
Ingredients
2 lb raw deer tongues (several tongues may be needed)
1 onion, quartered
1 bay leaf
1 tsp salt
Water to cover by 1 inch
1 additional onion, thinly sliced
2 tbsp butter
2 tbsp flour
1½ cups low-sodium beef broth
¼ tsp black pepper
Directions
Start with properly cleaned, processed tongues with throat tissue, tonsils and lymph nodes removed. Do not rinse raw meat in the sink. Put tongues in a pot with onion, bay leaf, salt and water.
Bring to a boil, then reduce to a gentle simmer. Cover and cook 2–3½ hours until very tender, adding water to keep covered. Centers must reach at least 165°F; tenderness takes longer.
Lift tongues out. As soon as cool enough to handle, peel off the thick outer skin while still warm. Trim away rough tissue at the root; discard skin, trimmings, onion and bay leaf. If skin will not peel easily, simmer tongues longer.
Slice peeled tongue ¼ inch thick.
Soften sliced onion in butter over medium heat for 10 minutes. Stir in flour for 1 minute, then slowly stir in broth. Simmer 5 minutes and add pepper.
Add tongue and simmer gently for 3–5 minutes until hot. Serve over mashed potatoes.
The 2 lb is raw weight, not 2 lb peeled meat. Yield varies; these are modest four-person portions with bread or potatoes alongside. If prepared ahead, chill promptly and reheat to 165°F before hot serving.
Hash It Out After Breakfast · Tongue and Potato Hash
Open the recipe card +
Original home-cooking draft · Not kitchen-tested. Independently authored. Playful Yooper names, not a claim of traditional regional authorship.
Tongue and Potato Hash
Serves: 4
Hash It Out After Breakfast
Ingredients
2 lb raw deer tongues (several tongues may be needed)
1 onion, quartered
1 bay leaf
1 tsp salt
Water to cover by 1 inch
1½ lb potatoes, cut into ½-inch cubes
1 additional onion, diced
2 tbsp oil
½ tsp paprika
¼ tsp black pepper
Directions
Start with properly cleaned, processed tongues with throat tissue, tonsils and lymph nodes removed. Do not rinse raw meat in the sink. Put tongues in a pot with onion, bay leaf, salt and water.
Bring to a boil, then reduce to a gentle simmer. Cover and cook 2–3½ hours until very tender, adding water to keep covered. Centers must reach at least 165°F; tenderness takes longer.
Lift tongues out. As soon as cool enough to handle, peel off the thick outer skin while still warm. Trim away rough tissue at the root; discard skin, trimmings, onion and bay leaf. If skin will not peel easily, simmer tongues longer.
Dice peeled tongue into ½-inch pieces. Boil potatoes in a separate pan 7–9 minutes until just tender; drain well.
Fry diced onion and potatoes in oil over medium heat for 12–15 minutes, turning occasionally, until browned.
Add tongue, paprika and pepper. Cook, turning, for another 5–7 minutes until hot throughout. Taste before adding more salt.
The 2 lb is raw weight, not 2 lb peeled meat. Yield varies; these are modest four-person portions with bread or potatoes alongside. If prepared ahead, chill promptly and reheat to 165°F before hot serving.
Don’t Tell Grandma We Used Her Crackers · Crumb-Fried Tongue
Open the recipe card +
Original home-cooking draft · Not kitchen-tested. Independently authored. Playful Yooper names, not a claim of traditional regional authorship.
Crumb-Fried Tongue
Serves: 4
Don’t Tell Grandma We Used Her Crackers
Ingredients
2 lb raw deer tongues (several tongues may be needed)
1 onion, quartered
1 bay leaf
1 tsp salt
Water to cover by 1 inch
½ cup flour
1 egg
2 tbsp milk
1 cup finely crushed saltines
¼ cup oil
Directions
Start with properly cleaned, processed tongues with throat tissue, tonsils and lymph nodes removed. Do not rinse raw meat in the sink. Put tongues in a pot with onion, bay leaf, salt and water.
Bring to a boil, then reduce to a gentle simmer. Cover and cook 2–3½ hours until very tender, adding water to keep covered. Centers must reach at least 165°F; tenderness takes longer.
Lift tongues out. As soon as cool enough to handle, peel off the thick outer skin while still warm. Trim away rough tissue at the root; discard skin, trimmings, onion and bay leaf. If skin will not peel easily, simmer tongues longer.
Cut peeled tongue into ⅜-inch slices and pat dry. Put flour on a plate, beat egg with milk in a bowl, and place crumbs on another plate.
Coat slices in flour, then egg, then crumbs. Heat oil in a skillet over medium heat.
Fry in batches 2–3 minutes per side to start, until golden and the center reaches 165°F. Time varies with thickness. Discard unused egg and coating mixtures. Drain on a rack and serve immediately.
The 2 lb is raw weight, not 2 lb peeled meat. Yield varies; these are modest four-person portions with bread or potatoes alongside. If prepared ahead, chill promptly and reheat to 165°F before hot serving.
Dat Horseradish’ll Wake Ya Up · Tongue with Warm Mustard Cream
Open the recipe card +
Original home-cooking draft · Not kitchen-tested. Independently authored. Playful Yooper names, not a claim of traditional regional authorship.
Tongue with Warm Mustard Cream
Serves: 4
Dat Horseradish’ll Wake Ya Up
Ingredients
2 lb raw deer tongues (several tongues may be needed)
1 onion, quartered
1 bay leaf
1 tsp salt
Water to cover by 1 inch
1 tbsp butter
1 tbsp flour
1 cup low-sodium beef broth
¼ cup sour cream
1 tbsp prepared horseradish
1 tsp yellow mustard
Directions
Start with properly cleaned, processed tongues with throat tissue, tonsils and lymph nodes removed. Do not rinse raw meat in the sink. Put tongues in a pot with onion, bay leaf, salt and water.
Bring to a boil, then reduce to a gentle simmer. Cover and cook 2–3½ hours until very tender, adding water to keep covered. Centers must reach at least 165°F; tenderness takes longer.
Lift tongues out. As soon as cool enough to handle, peel off the thick outer skin while still warm. Trim away rough tissue at the root; discard skin, trimmings, onion and bay leaf. If skin will not peel easily, simmer tongues longer.
Slice peeled tongue and keep warm in a little cooking liquid.
Melt butter in a saucepan, stir in flour for 1 minute, then whisk in broth. Simmer 4 minutes.
Remove from heat. Mix a little hot sauce into sour cream, then stir into the saucepan with horseradish and mustard. Spoon over drained hot tongue. Do not boil after adding sour cream.
The 2 lb is raw weight, not 2 lb peeled meat. Yield varies; these are modest four-person portions with bread or potatoes alongside. If prepared ahead, chill promptly and reheat to 165°F before hot serving.
Quit Talking, Da Noodles Are Ready · Tongue and Buttered Noodles
Open the recipe card +
Original home-cooking draft · Not kitchen-tested. Independently authored. Playful Yooper names, not a claim of traditional regional authorship.
Tongue and Buttered Noodles
Serves: 4
Quit Talking, Da Noodles Are Ready
Ingredients
2 lb raw deer tongues (several tongues may be needed)
1 onion, quartered
1 bay leaf
1 tsp salt
Water to cover by 1 inch
8 oz dry egg noodles
2 tbsp butter
8 oz mushrooms, sliced
½ cup low-sodium beef broth
¼ tsp black pepper
1 tbsp chopped parsley, optional
Directions
Start with properly cleaned, processed tongues with throat tissue, tonsils and lymph nodes removed. Do not rinse raw meat in the sink. Put tongues in a pot with onion, bay leaf, salt and water.
Bring to a boil, then reduce to a gentle simmer. Cover and cook 2–3½ hours until very tender, adding water to keep covered. Centers must reach at least 165°F; tenderness takes longer.
Lift tongues out. As soon as cool enough to handle, peel off the thick outer skin while still warm. Trim away rough tissue at the root; discard skin, trimmings, onion and bay leaf. If skin will not peel easily, simmer tongues longer.
Cut peeled tongue into bite-size strips. Cook noodles according to package directions and drain.
Melt butter in a skillet; brown mushrooms for 7–8 minutes. Add broth and tongue; simmer gently 3–4 minutes until hot.
Toss with noodles and pepper. Add parsley if using and serve immediately.
The 2 lb is raw weight, not 2 lb peeled meat. Yield varies; these are modest four-person portions with bread or potatoes alongside. If prepared ahead, chill promptly and reheat to 165°F before hot serving.
Keep it safe.
CWD: Cooking or freezing does not eliminate CWD prions. Follow local testing guidance; do not eat meat from deer that test positive or appear sick. CDC guidance · Minnesota DNR: cooking and freezing.
Cook venison to 165°F (74°C), following Michigan State University Extension’s Michigan Venison guide, checked with a food thermometer in the thickest part, away from bone. Reheat leftovers to 165°F (74°C). Color and cooking time are not safety tests. All recipes below are original home-cooking drafts, not kitchen-tested. Times are estimates, not guarantees of doneness.
Thaw in the refrigerator, not on the counter. Wash hands with soap for 20 seconds; wash boards and utensils after raw meat. Keep raw meat away from ready-to-eat food and use a clean plate for cooked meat. Do not rinse raw meat.
Refrigerate leftovers in shallow containers within 2 hours, or 1 hour above 90°F. Keep the fridge at 40°F or below. Use refrigerated leftovers within 3–4 days or freeze them. USDA leftover guidance. These are home-cooking ideas, not a promise that every cut is available.